Reminder - in all my tutorials, green text can be skipped by modding vets, and red text can be skipped by beginners. These are side notes meant to clarify something I imagine certain readers will have questions on, and if they are not targeted at your skill level, you can skip them or ignore them if they are over your head or seem obvious.
¶ Intro
In this guide, you're going to learn some basic tips for decorating your building, but the primary purpose of this is going to be to introduce you to the export and import tools available to make setting up buildings in Sim Settlements 2 incredibly simple.
In the Your First Building Model tutorial, I had you do things "the hard way". You had to create a lot of various forms in the Creation Kit, and we didn't even hit all of the steps. There are lots of little extra flourishes you could have done to make your building more complete.
This was important to learn though, as it shows you the basics of how a Building Plan is laid out so that you can make tweaks to things in the future, and so that when I talk about the import tool you'd have the basic experience for it all to make sense.
The import method makes the whole process a breeze. For the most part, all you have to do going forward is design your building models and turn them into Nifs, then set up the static forms, place your decorations, and then export all this information from the Creation Kit. After that you need to do almost nothing else in the CK! That's how powerful this import tool is.
So you do all the creative work, and it will handle most of the busy work.
¶ What Should I Already Know?
As part of the numbered Guided Series, this assumes you have gone through the previous guides in this series, and will gloss over things you should know by now.
You should have already created a simple single level building in the previous tutorial, and will be asked to work on that.
¶ Decorating A Building
Before we can get to this super easy process, you need to understand a little bit of what we call the Stage Items (or you might see StageItemSpawns written in some places). These are the items that are somewhat dynamic and so can't be, or are limited if they are, a part of your building model.
A building plan is made up of a series of stages. When your building is being constructed, you've seen it go through these stages where the model slowly gets fleshed out. Each of these models is considered the Stage Model.
We haven't covered those construction stages yet in the Guided Series, but they are just variations of the model to make it look like it was built over time and they are completely optional (although very much appreciated by players!). You can check out the Construction Stages guide for some tips on making these easily!
Stage Item Spawns simply means they are items that are spawned on your building when it reaches a particular stage. Things like lights, interactive furniture (beds, containers, chairs), randomized clutter (we'll cover that in another guide), sound markers, or pretty much anything that isn't a large static model.
Rather than us baking these into a model, each is kept independent so it can function as it normally does. Since you're building off of the previous tutorial, your building is centered at the 0/0/0 coordinates, which means all of the items you're about to decorate will be perfectly positioned for us to easily export them!
Most of the time we only tend to decorate the last stage in each of our building's levels, which you'll see us often name them the Final Stage Model, or sometimes the Level Stage Model. This is because the other stages only last a few seconds each, so it becomes a lot of unappreciated energy to decorate them - though the code does support it if you want to go the extra mile!
The one exception to this is Beds. We will often arrange for a bed to exist in all stages to help prevent drops in happiness, this is especially important for players who use the "Realistic Build Times" option, which makes the building take a day or more gametime to construct, rather than a minute or two of realtime.
I'm assuming you came here after doing the "Your First Building Model" tutorial, so go ahead and load up that plugin you made. Or, if you didn't keep your plugin (or skipped it...), you can always start a new plugin and drag one of the SS2 building statics into the cell for these steps.
If you are starting a new plugin, refer to the previous tutorial so you can get caught up. If you don't want to design another structure, pick one of the Static SS2 prefixed structures to drag onto your layer instead of creating a new building when you get to that stage.
- In the Cell View window, open the cell SS2BuildingStage by double-clicking it.
- In the Layers window, find your level 1 building layer you created in the previous tutorial, right-click it and choose Hide All Other Layers.
- In the Layers window, click New Layer, and give it a unique name. Something like yourPrefix_MyFirstBuilding_Level1_StageItems.
- Right-click this layer in the Layers window and click Make Active Layer. This way everything you drag into the render window will be on this layer which will make exporting it very easy.
- Begin filling out your building!
The only actual requirement you ever need to have, is a bed for residential buildings. Otherwise, no buildings require a specific piece of furniture, activator or other particular items, they are entirely up to you! Everything from food production to shop keeper wares are controlled by the Building Class you set up for your plan.
Basically anything in the WorldObjects section, other than Statics are good candidates for decorating with. Doors, Lights, Activators, and Furniture can all make your building more interesting.
The one place you may still want to use some statics are for decorations. While you can use actual lootable objects, it is not recommended due to the Refresh system in Sim Settlements 2. You'd effectively be creating an infinite resource exploit. In addition, its fairly taxing on players systems.
Instead we have a large number of clutter items to choose that include a variety of items arranged in random piles broken up by theme. For example, Kitchen, Personal, Workshop, etc. You can find these by filtering for SS2*clutter or kgSIM*clutter under WorldObjects > Static. The ones with Random in the name can easily be converted over to use our Random Clutter system in a future tutorial!
If you're unsure how to start, here are the rules we tend to follow on the SS2 team with the goal of making the owner of each building appear struggling at level 1 and be thriving by level 3:
Level 1: Keep it simple, no electricity and nothing too colorful as that implies they have extra money for luxuries and these people are barely surviving. (The electricity rule gets thrown out the window for the Power Plant class, and all of the Advanced and Hi-Tech building classes)
Level 2: Incorporate electricity into the design with basic lighting. Add a few more bits of furniture and clutter.
Level 3: Add in plenty of clutter, including decorative colorful things, and more advanced electrical items such as lamps, radios, televisions, or other non-essential luxury items.
Warning: Never use a Plot as a Stage Item.
¶ Exporting Stage Items
Once you're satified with the extra items in your building, it's time to export this data so we can use our import tool!
- Save your plugin.
- Export your data.
- Right-click the layer you created for Decorations in the previous section, and choose Select All Loaded References in Layer.
- Click the File menu at the top left of the Creation Kit, then go to Import/Export > Ref Placements for Selection (which is towards the bottom).
- You will be prompted to choose a file location. I recommend setting yourself up a folder somewhere on your hard drive named something like SS2 CK Exports, then enter a name for your file something like BuildingName_Level1_StageItems, and click Save.
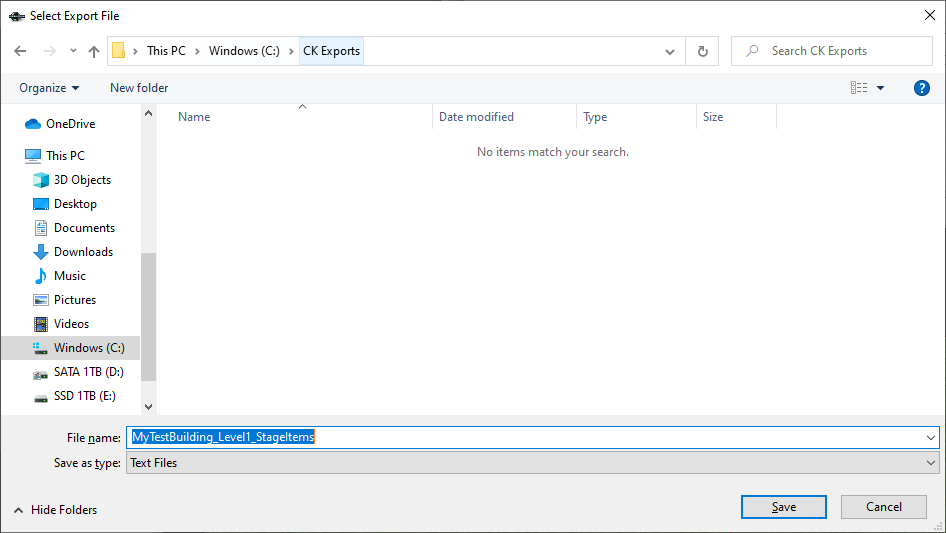
This method of exporting can also be used in the future to quickly export a bunch of model names, which will come in handy later after you've made Construction Stages and the levels for your building so it can be upgraded.
So remember this process, as it works on anything you select in the Render window!
- Close the Creation Kit.
If you fail to close the Creation Kit, you may end up with an error when trying to save your work during the upcoming use of the Import tool.
- Import the data into your spreadsheet software.
Don't worry! No formulas or anything are required, this is all really basic typing and copy pasting stuff.
- Open whichever spreadsheet software you like, you can use Excel, Open Office Calc, or even something like Google Docs.
Open Office Calc is what I'll be demonstrating with since it's free! You can download it from openoffice.org to follow along, or similar methods should exist for other software if you don't want to use this.
- Click the Insert menu at the top of the screen and select Sheet From File.
- Navigate to the file you exported from the Creation Kit, select it, and click Open.
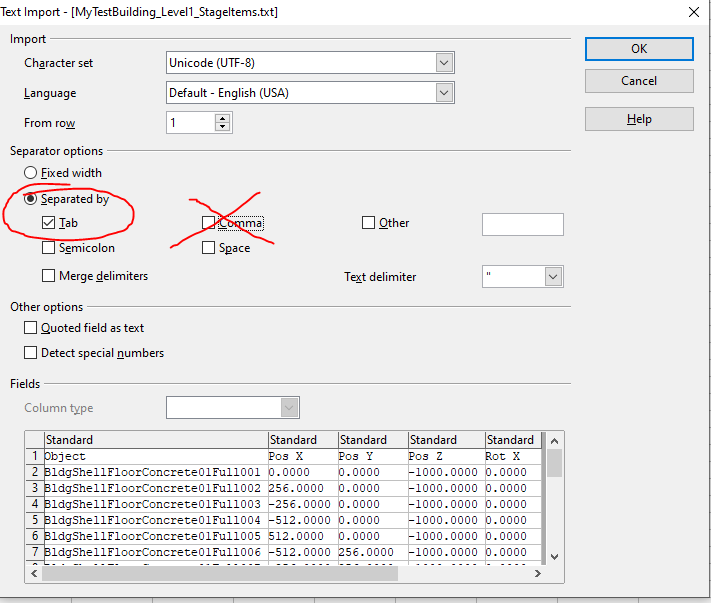
- When the Text Import prompt comes up, simply change the Separated by section in the center to have Tab checked in, and nothing else. Then click OK to accept the Text Import options, and again to accept the Insert Sheet options.
If you haven't already, you're going to want to grab the Addon Maker's Toolkit from here so you have access to some of the tools we've provided!
- You should now have a spreadsheet with the names of the items you placed, as well as their coordinates, rotation, and scale info. In the column labeled I, enter the word Level in the first box. Then enter the number 1 in the boxes below that until you get down to your last item. It should look something like the image below (except actually interesting items and not just a bunch of blocks I exported for the sake of making this spreadsheet...).
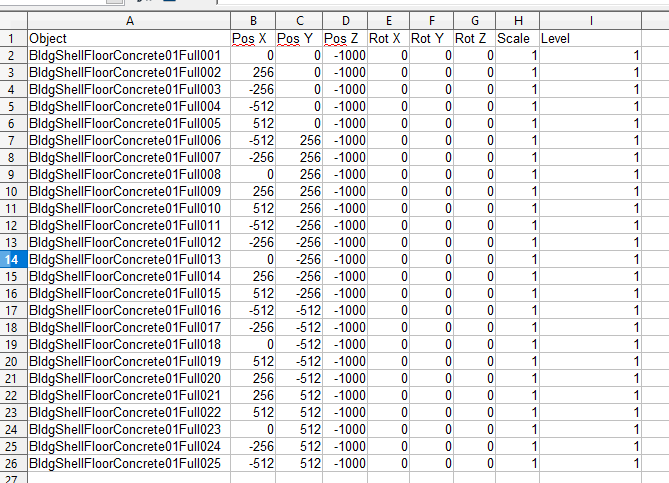
This spreadsheet actually supports a few other columns, we'll cover those in a more advanced tutorial in the future. These are all that are necessary for most use-cases!
- Choose File > Save As, then when the Save As dialog comes up, choose Text CSV from the Save as type dropdown, and check in the box Edit filter settings.
- Create a folder on your hard drive to store these, something like SS2 Import Sheets, and enter a filename for your file you will recognize like BuildingPlan_BUILDINGNAME_StageItems.
- Click Save. You will be prompted about format, answer Keep Current Format.
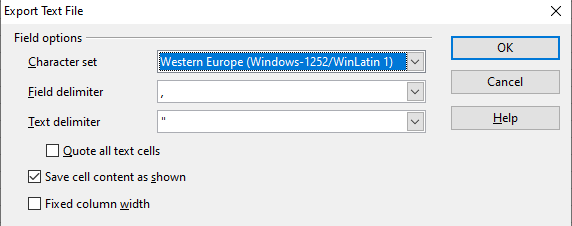
- When the Export Text File options come up, be certain the settings match this screenshot (which should be the default for most people), then click OK.
- Close the spreadsheet software.
- Launch FO4Edit.
If you don't have FO4Edit yet, or you didn't go through the set up where I have you copy the scripts from the Addon Maker's Toolkit to the appropriate directory, check out the Getting Started guide and head to the XEdit (aka FO4Edit) section.
- Search for your plugin in the list, then double-click it.
- Expand your plugin records by clicking the + sign next to your plugin name. Then expand the Weapon category.
- Find the building plan you are working on, then right-click it and choose Apply Script.
- In the Apply Script dialogue box, check in the box Include scripts from subdirectories.
- Find the script SS2\SS2_ImportStageData from the list. Then click OK. You should be presented a screen similar to that pictured below.
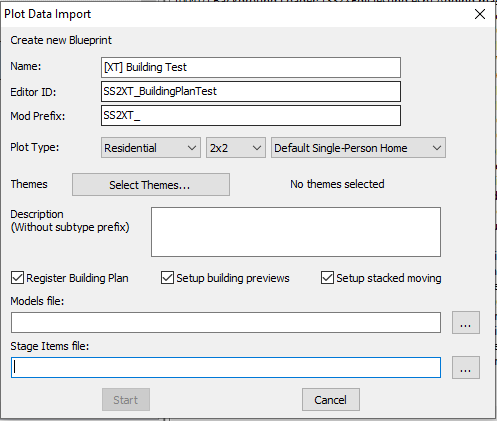
- Click on the ... button next to the Stage Items file field, and navigate to the file you created in step 4.
- Click Start.
- On the right-hand side of FO4Edit, a bunch of messages should print out, and eventually one will print to the bottom that says BLUEPRINT GENERATION COMPLETE. At which point you can safely close FO4Edit, and it will prompt you to Save changed files, to which you should click OK.
If you received an error from the script, and you aren't sure how to handle it, generally this means your spreadsheet was invalid. So check to confirm you used a comma as the delimiter.
Otherwise, you may have run into some sort of corner case or even a script bug and should contact us about fixing it! Good time to join our community Discord!
¶ You're Done!
Time to hop in game and test your building again just like you did at the end of the previous tutorial. This time though, your building should also have all of your extra items!
There's still plenty more cool stuff you can do, like adding levels so your buildings can upgrade! Which we'll cover in the next guide.