Reminder - in all my tutorials, green text can be skipped by modding vets, and red text can be skipped by beginners. These are side notes meant to clarify something I imagine certain readers will have questions on, and if they are not targeted at your skill level, you can skip them or ignore them if they are over your head or seem obvious.
¶ Intro
Now that you have a basic single level building working, you're probably anxious to see it upgrade. So let's make that happen!
In addition, I'm going to show you how to better take advantage of the spreadsheets that we used in the previous tutorial so you can let the import tool basically do everything but the building design for you! All of those steps you did in setting up the weapon records and other random bits in the "Your First Building Model" tutorial can be skipped!
Once you've mastered the building plan system and are looking to get more creative with functionality, it's a good idea to learn how all of those different forms work. So even though you're skipping them now, they offer a lot of power in what you can make your building do that you'll learn about when you read more of the tutorials and guides after the Guided Series.
¶ What Should I Already Know?
As part of the numbered Guided Series, this assumes you have gone through the previous guides in this series, and will gloss over things you should know by now.
For this particular tutorial, we'll assume you're coming with at least a single level building and need to create the other levels, and have tried the import script in the previous tutorial.
¶ Creating Levels
Much like the "Your First Building Model", I'm not going to tell you how to design your building. Instead, I'm going to give you some tips to make your life easier in the future regarding layers, and talk about how you can set up spreadsheets for handling the import of your building models, the same way you did for your Stage Items in the previous tutorial!
¶ Layer Management
In the "Your First Building Model" tutorial, I recommended you set up a layer called something like yourPrefix_MyFirstBuilding_Level1. So we'll do the same thing to start your level 2 and 3 models, in fact I'd even use the exact same name for your other layers, only changing the number for each.
If you create a New Layer, and then never put anything on it, the next time you create a New Layer, change cells, or reload the plugin, it will appear that the previous layer you created has disappeared.
In reality, the Creation Kit has just hidden it from your cell. To restore it, you click New Layer and enter the exact same name as you used the first time. If you don't recall the exact name, you can always look up your layers in the Object Window, under Miscellaneous > Layer.
Now when you're ready to build, right-click the appropriate layer level and choose Make Active Layer, and then right-click it again and choose Hide All Other Layers so you have a clean stage to work from.
Making higher level building models and decorating them is exactly the same process as making the first level, and it's up to you how much it evolves each time.
You can make the changes extremely subtle, perhaps just extending one wall a bit to add a bit of space. You can go bigger dramatically expanding the footprint, or adding additional floors vertically. Heck, you can even go extreme and change the building completely each level (see our kgSIM_WeaponStore01_SA_ statics for an example), you can also go the opposite and use the exact same model for each level and lean on your Stage Items to establish the level differences.
¶ Level Building Design Tips
If you'd like your models to flow naturally between levels, my personal strategry is to start each level with a copy of the Static Collection (SCOL) version of the previous level at 0/0/0 on my new level's layer (very important your layer is active when you drop the SCOL on it and do the next step).
Then I fragment that SCOL by clicking it, and using the hotkey Alt+U. This will give you a warning which you should answer Yes too, and now you have your previous level in pieces to work from.
Next, I'll pick a wall and expand it out, if my building didn't use the full plot space, or move some of the ceiling and start preparing an upper level if I'm already using the full footprint of the building. Then I just start expanding it from there.
By starting with your previous model, and moving only the pieces you need to make room to grow, it will feel like your settlers are doing renovations to add an addition onto their building!
Another benefit to this approach, is throughout this process, you could stop and create additional SCOLs to act as the Construction Stage models for between those levels!
If your plan is to follow all the way through this guide to get a complete building plan, remember to complete the full steps and export your nif and set up a Static record like you did a couple tutorials back.
¶ Faster Stage Items
Decorating can also be a breeze if you follow the pattern from before and setting up a copy of the previous level on your new level. So start by creating a layer with the same name as your level's building model layer, and add _StageItems to the end. Make it active.
Next, unhide the previous level's _StageItems layer if it is hidden, then right-click it and choose Select All Loaded References In Layer. Now with all those items selected, click on the title bar of the render window and hit the hotkey Ctrl+D.
If you did everything correctly (most common mistake here is forgetting to make the new layer active), you should have a copy of all of the previous level's stage items on your new level's StageItems layer!
Now you can once again hide the previous layer, and the reorganize your stage spawns to handle any changes to the building, perhaps upgrade some that make sense to show progression of the building (for example, maybe upgrade an old mattress on the floor to an old mattress on a bed frame for a Residential; or perhaps give your shop some nicer chairs for it's customers).
Then add any new things you want for the level.
One of the nice things about this approach, is you are providing some continuity to the feel of the inside of the building by re-using some of the same items, even if they were moved to a different location, or perhaps just upgrading some items that remained in the same space. So it simultaneously saves you time and creates a stronger design.
¶ Exporting Everything
In the previous tutorial, I showed you how to export your Stage Items to make quick work of adding them to your building thanks to the Import tool. Now we're going to repeat that, but also do it for your building models! (And Construction Stages if you happened to go create some of those)
Start with exporting your Stage Items for level's 2 and 3 like you did in the previous tutorial, doing one level's layer items per export. Giving you three total stage item documents.
Next, hide all layers, then unhide the Default layer and make it active.
Now filter for all of your building models in the Object window (if you've followed my ID naming conventions, they should be all next to each other) select them all in the Object window (you can drag select a box around them or Ctrl+click each), then drag them into the Render window. Position doesn't matter.
If you made construction stages, grab those too and toss them into the Render window.
Now right-click the Default Layer and close Select All Loaded References in Layer, then repeat the export process used on the Stage Items, only this time name your file something like BuildingPlan_BUILDINGNAME_StageModels.
Then exit the Creation Kit so you can use the Import Tool.
¶ Preparing the Import
Now it's time to prepare your spreadsheets for import. For the stage items, the method is basically the same as what you did in the previous guide, except that you are now going to import the two additional levels into the same spreadsheet so that all of them are stacked on top of each other.
If you kept the spreadsheet from the previous tutorial, you can even start with that.
Once you have the first sheet imported, the second and third sheets need to be handled a bit differently.
Just as in the previous tutorial, I'll demonstrate with Open Office Calc since it is free and anyone can grab it to follow along.
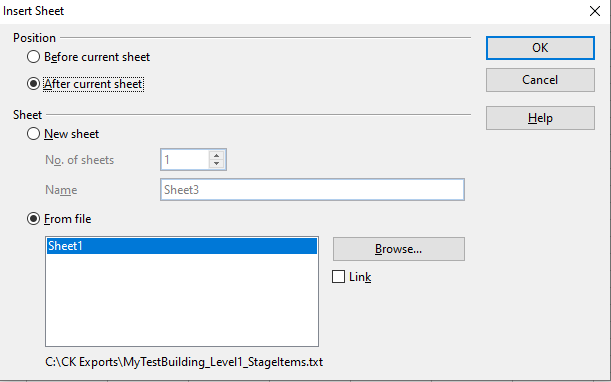
- Follow the same initial steps to import the next sheet, but after you've established the tab seperation, and hit OK to that screen, you're going to change the Position field on the other screen to After current sheet before hitting OK.

- At the bottom of the window, you'll now see two sheets. Go to the second sheet by clicking that tab if it's not already selected, then highlight all of the data, except for the first row.

- Click Ctrl+C on your keyboard to copy it, then go to the first sheet and click on the first empty box to the far left below all the previous level's entries and press Ctrl+V on your keyboard to paste it.
- In column I, enter the level for all of these items.
- Repeat these steps for the final level.
Your first sheet should now have all 3 levels of items stacked on top of each other with level 1 items, then level 2, then level 3, with column I indicating which level each item belongs to.
- You can save this file following the same steps as the previous tutorial as it is ready for import. Don't close the software though.
Next we need to prepare the Stage Models for import.
- Start a new spreadsheet by clicking File > New. Then in the very first box in the upper left corner, enter the word default. This will tell the importer that you are happy with the default Building Materials SS2 uses.
Building Materials are what appear on a plot before the building has started construction. You have the ability to customize this for your building plan and can set this up by entering a specific stage model's ID in this box instead of the word "default".
- Import the StageModels file you exported from the Creation Kit, and place it After current sheet like you did in step 1 for the Stage Items.
Unlike the Stage Items, we are not going to copy-paste all of the data from the sheet at once, but will do it one item at a time. For the Stage Models spreadsheet you are creating, each row represents one level of your building.
On that row, you put all of your Construction Stage Models in order (if you have any) followed by your final building model for that level.
- Find any Construction Stage Models you have for level 1 on that sheet (it's OK if you don't at this point), and copy paste them one at a time to row 2 of the first sheet.
- Then copy paste the final building for level 1 after the construction stages on row 2.
If you had no construction stages, then your sheet will simply have default in the first box of the first row, and your level 1 building model in the first box of the second row.
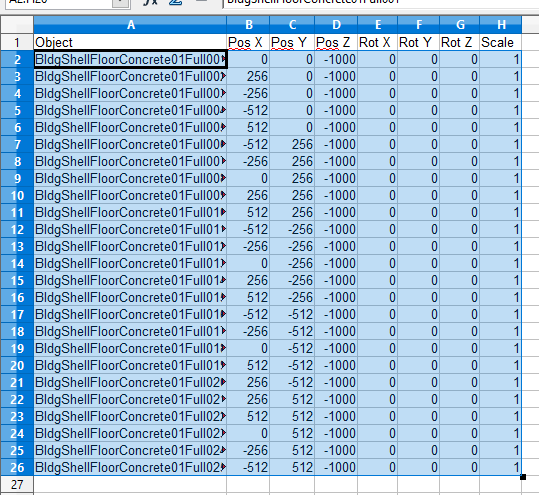
- Repeat steps 9 and 10 for levels 2 and 3 of your building on the next rows. After you are finished, your sheet should look something like one of the examples in the below images.


Notice how in the second example, the number of Construction Stages is different for level 3. This is completely acceptable, you can have as many or as few Construction Stages as you like - even none!
Though I'll reiterate they are very much appreciated by players, they make it feel much more like these structures are being built, rather than just popping into existence, even though technically they are just popping into existence either way.
- Save your spreadsheet using the same steps and settings as for the StageItems, except name this something like BuildingPlan_BUILDINGNAME_Models.
This might seem odd that I didn't suggest naming it BuildingPlan_BUILDINGNAME_StageModels. The reason for this is that I've seen plenty of people, myself included, accidentally point to the wrong sheets during the import phase because StageItems and StageModels look so similar at a glance, and then you can end up with a super messed up building plan.
This naming scheme will make it much less likely you make this mistake. Of course, all of these naming schemes are suggestions only - you are free to name things however is useful for you!
¶ Importing a Full Building Plan
This is done in the exact same way as the previous tutorial (ie. running Apply Script on your building plan record and filling out the form that appears), except that you will also be selecting the Models file during the process. And since we're doing a more full featured building plan, this might be a good time to click Select Themes, which you can learn more about here.

At the start of this tutorial, I mentioned wanting to show you the true power of this tool. So let's talk about your second building plan.
The next time you want to make a building plan or even another addon pack, skip everything you learned about setting up weapon records, and quests, and all of that. Just focus on the design work.
Build out your models, your construction stages, layout your Stage Items, and get your three levels all set up exactly how you want them. Then follow the export process and make your spreadsheets.
Here's where we change course.
Since at this point, you won't have created any Building Plan records for this plan, you won't be calling Apply Script on one. Instead, you will expand your plugin in XEdit, right-click on File Header, and choose Apply Script and pick the same SS2\SS2_ImportStageData script you've been using..
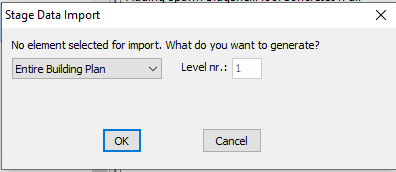
Now you will receive a pop-up like this:

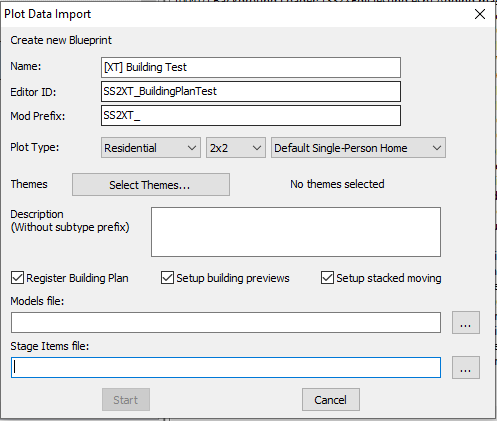
Click OK to this, and you will then be presented with the same Plot Data Import form. Only this time, you'll need to fill out a little more information.
- Enter the Name you would like player's to see. I recommend something like [X] Building Name by Your Name. Where X is a 2 to 3 character abbreviateion for your mod, Building Name is what you want to call it, and Your Name is your real name or online handle.
- For the Editor ID, this is the field labeled ID in the Creation Kit, so it needs to be something absolutely unique. I recommend something like yourPrefix_BuildingPlan_BUILDINGNAME.
- If this is a new plugin, you'll also need to fill out the Mod Prefix box, which is the yourPrefix I reference everywhere that will be used to prefix all of the forms this tool creates for you.
- Fill out the three Plot Type drop-down menus, which represent the Plot Type, Plot Size, and Building Class you want your Building Plan to be for.
Some of the Martial and Recreational Classes are not yet implemented. The functionality for these will be restored when we re-release Conqueror for SS2. In the meantime, you should NOT use the following classes: Armory, Battlefield Scavengers, Field Surgeon, Prison, Recruitment Center, Watch Tower, Cemetery, Outpost Mess Hall, Outpost Training Yard.
- Fill in the Description field with a brief description you want players to see when deciding whether to choose your building. This should be something very short describing the building or mentions anything unique about it. (Look to other SS2 buildings in game for inspiration about how to phrase these)
- Leave all of the check boxes checked in, it's rare anyone will want to uncheck those until they are doing advanced things. (Once you're at that point, you will know enough about the system to understand what each of them do based on their names)
- Point the last two boxes to your spreadsheets as you've done in the past.
- If you want to set up the Themes, you can read more about them here.
Since the Importer was not run on an existing building plan, one will be created for you, including all of the auxillary records! Even better, if this is a brand new plugin, it will even create all of the addon configuration data to register it with SS2 automatically!
Something very important to know about Sim Settlements 2: It uses version control on your Addon! So you have to do something else to add more plans to existing saves that have already played with your Addon.
I brought this up in the "Your First Building Model" tutorial, but it's one of the most common problems I saw early addon designers run into, so it bares repeating.
After you've released your Addon pack and are looking to update with additional content, you need to increase the value of your Global that holds your version number for the AddonConfig. If you allowed the Import tool to create the addon config for this plugin, it will be called yourPrefix_AddonVersion.