Reminder - in all my tutorials, green text can be skipped by modding vets, and red text can be skipped by beginners. These are side notes meant to clarify something I imagine certain readers will have questions on, and if they are not targeted at your skill level, you can skip them or ignore them if they are over your head or seem obvious.
¶ Intro
Now that you have a room design in HQ, you likely want to know how to make things other than "Living Quarters that fit in the LowerSouthwestOffices2ndFloor" space.
Fortunately, the process of designing a room, is always as simple as you saw in the previous tutorial. Find the space you want to work in, toss in a bunch of items, and then using the export/spreadsheet method to tell SS2 about your design. Some of the options you select during this process to make different types of rooms require that you understand Room Configs.
In order to set up your room deisgn to work with HQ, you need to identify two things: the Shape of the room, and what you want your room design to do - ie. it's purpose. These two things combined, Room Shape and Purpose, make up the Room Config.
¶ Room Shape
If you look around GNN, you'll notice a lot of the rooms have the exact same shape. Their door is in the same place, their ceilings are the same height - effectively they are the same room just in different places. Just like a plot is the exact same thing in different locations.
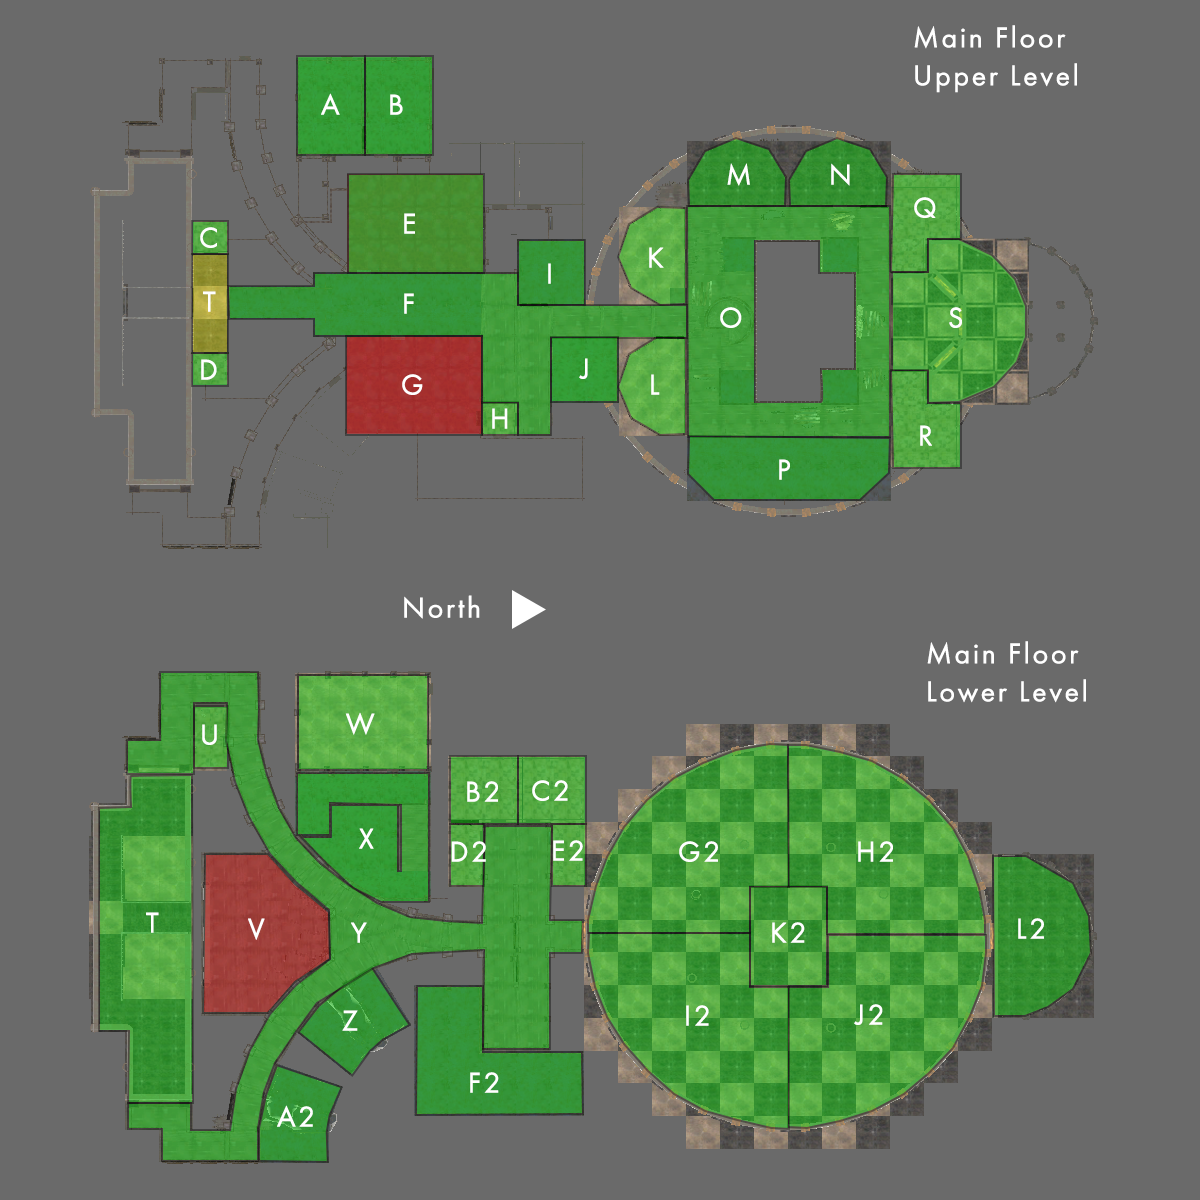
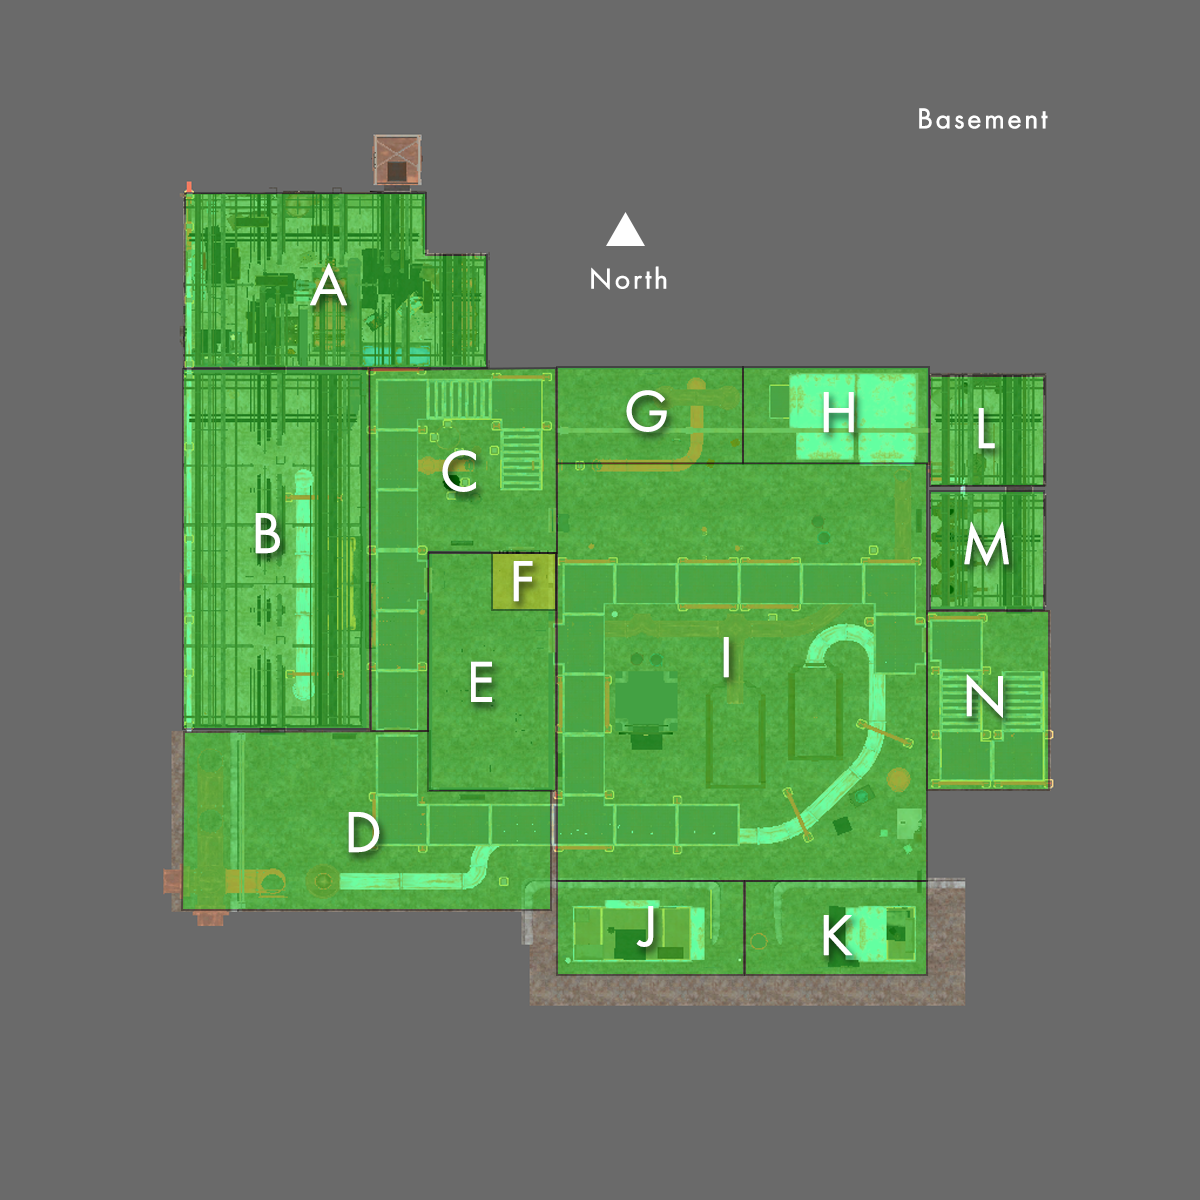
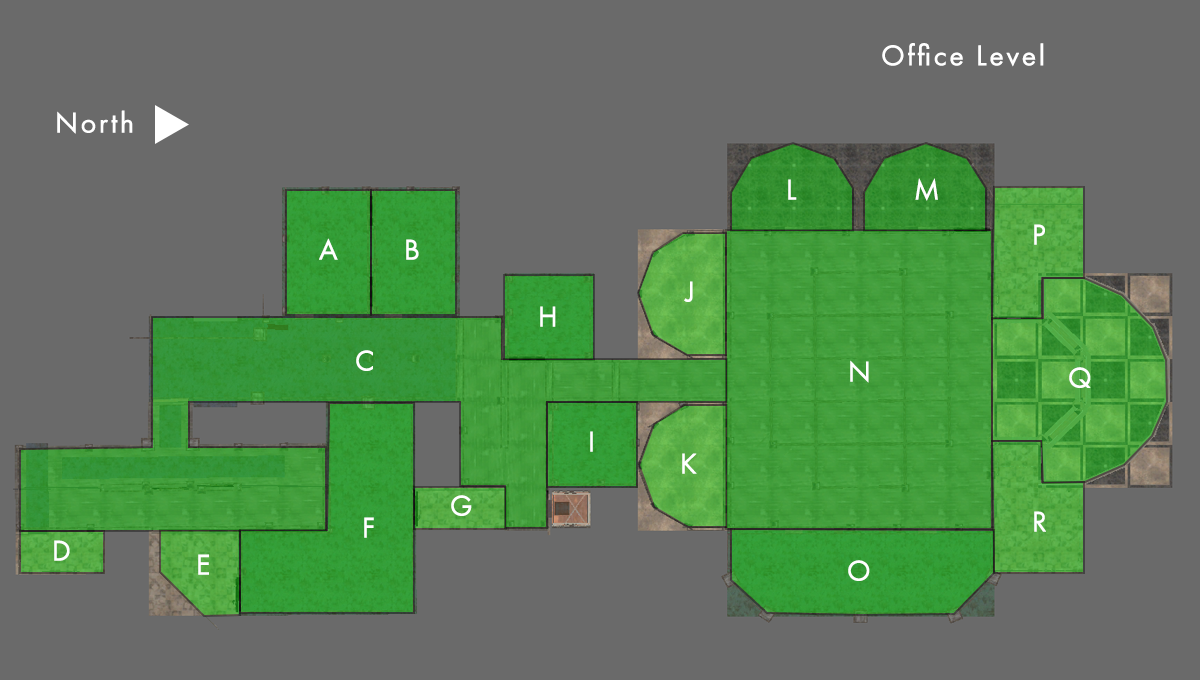
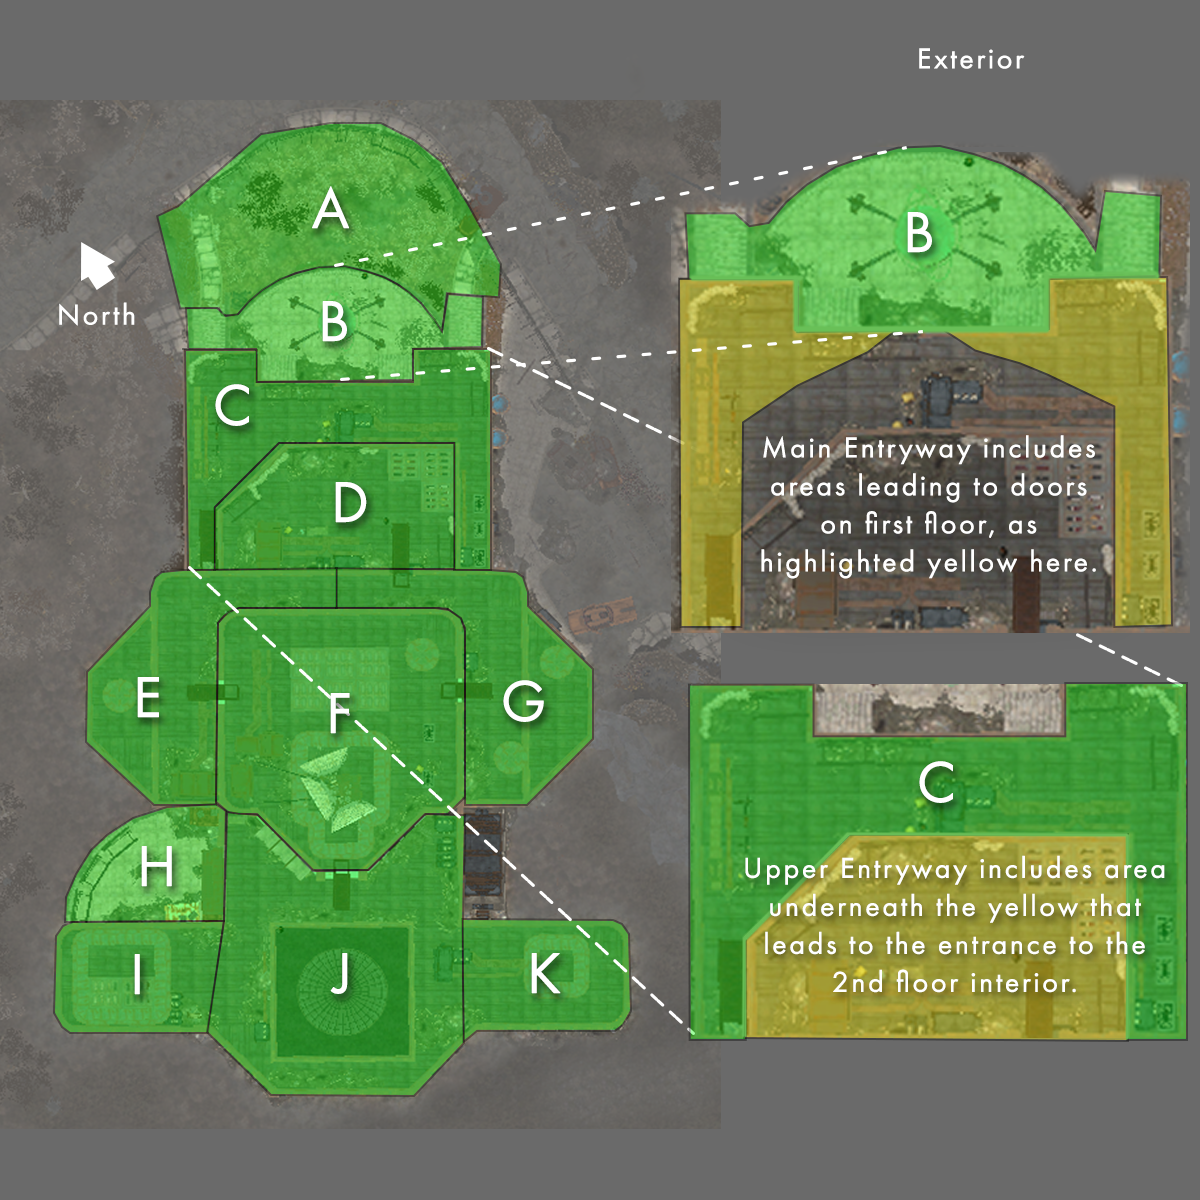
So the first step is figuring out what the shape is called for the room you're designing in. To make this easier, I've created a series of diagrams and keys to help you find your room shape, as well as the layer in the cell.
Since all of the layers start with SS2_GNN, and all of the shapes start with SS2C2_Tag_RoomShape_, I'll leave those parts off to save space in the legends below.
¶ Main Floor

The rooms in red are reserved for the main questline of SS2 and so generally can't be built in.
| * | Layer | Shape |
|---|---|---|
| A | LowerSouthwestOffices2ndFloor_South | GNN512x768Rectangle_EntranceLeft |
| B | LowerSouthwestOffices2ndFloor_North | GNN512x768Rectangle_EntranceLeft |
| C | BathroomUpperSouthWomens | GNN256Box |
| D | BathroomUpperSouthMens | GNN256Box |
| E | UpperSouthOfficeWest | GNNLargeOfficeWest |
| F | UpperHallways | GNNUpperFloorHallways |
| G | UpperSouthOfficeEast | GNNLargeOfficeEast |
| H | UpperSupplyCloset | GNN256Box |
| I | UpperOfficeWest | GNNUpperOfficeWest |
| J | UpperCentralOfficeEast | GNN512Box_EntranceLeft |
| K | UpperBalconyOfficeSouthwest | GNNSemiCircle |
| L | UpperBalconyOfficeSoutheast | GNNSemiCircle |
| M | UpperBalconyOfficeWestSouth | GNNSemiCircle |
| N | UpperBalconyOfficeWestNorth | GNNSemiCircle |
| O | UpperBalcony | GNNUpperBalcony |
| P | UpperBalconyOfficeEast | GNNLargeSemiCircle |
| Q | BathroomUpperNorthMens | GNN_L |
| R | BathroomUpperNorthWomens | GNN_LReverse |
| S | UpperEntryway | GNNUpperEntryway |
| T | Foyer | GNNFoyer |
| U | LowerSouthwestNook | GNNLowerSouthwestNook |
| V | Studio | GNNStudio |
| W | LowerSouthwestOffices1stFloor | GNNLowerLargeSouthwestRoom |
| X | LowerSouthwestOfficesReception | GNNLowerSouthwestReceptionArea |
| Y | LowerHallways | GNNLobbyFloorHallways |
| Z | LowerSoutheastOfficesWest | GNN_M |
| A2 | LowerSoutheastOfficesEast | GNN_M |
| B2 | BathroomLowerMens | GNN512Box_EntranceRight |
| C2 | BathroomLowerWomens | GNN512Box_EntranceLeft |
| D2 | LowerClosetSouth | GNN512x256Rectangle_EntranceRight |
| E2 | LowerClosetNorth | GNN512x256Rectangle_EntranceLeft |
| F2 | LowerCentralOffice | GNNCentralOffice |
| G2 | MainHallSWQuadrant | GNNMainHallQuadrant |
| H2 | MainHallNWQuadrant | GNNMainHallQuadrant |
| I2 | MainHallSEQuadrant | GNNMainHallQuadrant |
| J2 | MainHallNEQuadrant | GNNMainHallQuadrant |
| K2 | Centerpiece | GNNCenterpiece |
| L2 | Entryway | GNNMainEntryway |
¶ Basement

Most of the basement shapes are extremely unique and so you'll find that the layer and shape names are frequently the same.
| * | Layer | Shape |
|---|---|---|
| A | NorthwestEntryway | GNNBasement_NWEntryway |
| B | WesternRoom | GNNBasement_WesternRoom |
| C | NorthwesternStairwell | GNNBasement_NWStairwell |
| D | SWCorner | GNNBasement_SWCorner |
| E | UpperCentralRoom | GNNBasement_UpperCentralRoom |
| F | CentralBathroom | GNN256Box |
| G | MainRoomNorthwesternCorner | GNNBasement_MainRoom_NorthwestCorner |
| H | MainRoomNortheasternCrib | GNNBasement_MainRoom_NortheastCrib |
| I | MainRoom | GNNBasement_MainRoom |
| J | MainRoomSouthwesternCrib | GNNBasement_MainRoom_SouthwestCrib |
| K | MainRoomSoutheasternCrib | GNNBasement_MainRoom_SoutheastCrib |
| L | NortheastRoomsNorth | GNN512Box_EntranceRight |
| M | NortheastRoomsSouth | GNNBasement_NortheastRoomsSouth |
| N | SoutheasternStairwell | GNNBasement_SEStairwell |
¶ Office Floor

Internally, the Office Level had been called the "Mid floor" for a large part of development, so you will find a mix of references to "Office" and "Mid".
| * | Layer | Shape |
|---|---|---|
| A | OfficeLargeWS | GNN512x768Rectangle_EntranceLeft |
| B | OfficeLargeWN | GNN512x768Rectangle_EntranceLeft |
| C | Hallways | GNNMidFloorHallways |
| D | UtilityClosetSouth | GNN512x256Rectangle_EntranceRight |
| E | UtilityRoomLarge | GNNMid_UtilityRoomLarge |
| F | OfficeLargeEast | GNNCentralOffice |
| G | UtilityClosetMiddle | GNN512x256Rectangle_EntranceSide |
| H | OfficeMidWest | GNN512Box_EntranceRight |
| I | OfficeMidEast | GNN512Box_EntranceLeft |
| J | SemiCircleOfficeSW | GNNSemiCircle |
| K | SemiCircleOfficeSE | GNNSemiCircle |
| L | SemiCircleOfficeWS | GNNSemiCircle |
| M | SemiCircleOfficeWN | GNNSemiCircle |
| N | MainRoom | GNNMid_MainRoom |
| O | SemiCircleOfficeLargeEast | GNNLargeSemiCircle |
| P | BathroomMens | GNN_L |
| Q | MarbledArea | GNNMidFloorMarbledArea |
| R | BathroomWomens | GNN_LReverse |
¶ Exterior

Note that setting up room designs in the Exterior is much different than the inside - so keep an eye out for a special tutorial about building in the Exterior!
| * | Layer | Shape |
|---|---|---|
| A | FrontBarricade | GNNExterior_FrontBarrierArea |
| B | MainEntryway | GNNExterior_MainEntryway |
| C | UpperEntryway | GNNExterior_UpperEntryway |
| D | UpperEntrywayRoof | GNNExterior_UpperEntrywayRoof |
| E | RoofCenterWest | GNNExterior_RoofCenterWest |
| F | RoofElevatorEntryway | GNNExterior_RoofElevatorEntryway |
| G | RoofCenterEast | GNNExterior_RoofCenterEast |
| H | FireEscapeArea | GNNExterior_FireEscapeArea |
| I | RoofSouthWest | GNNExterior_RoofSouthWest |
| J | RoofDomeArea | GNNExterior_RoofCenterDomeArea |
| K | RoofSouthEast | GNNExterior_RoofSouthEast |
¶ Purpose
The room purpose is effectively a way to group different room designs together. Similar to how Building Classes do the same thing for Plots. The purpose does not limit what a room design can do in any way, it is merely a convenient classification so players know what to expect.
When the player cleans a room in HQ, they will be presented with a menu to select what the room should be used for, aka the purpose. This menu basically looks up the Room Shape of the room being cleaned, and finds all Room Configs that have unlocked room designs associated with them to let the player choose.
There is no limit to which rooms can have which purpose, and really there's no limit to the number of different purposes we can add!
Check out the Requesting New Configs section for how to get more purposes added to the base of SS2!
¶ Room Configs
Rooms in HQ can be thought of very similarly to Plots, and Room Configs are basically the HQ eqivalent of a Plot type and size, and building class all rolled into one. Unlike plots which are limited to the 7 types (Agricultural, Commercial, etc) and 4 sizes (1x1, 2x2, Interior, 3x3), Rooms can have an unlimited number of types, and there are tons of different sizes (ie. the shape of the room).
Room Configs are stored as MiscObjects with a script on them, a few keywords, and the Name field filled out with the Purpose as the player will see it. In general, when creating these, all you need to know is the shape and purpose. You'll use those to select the correct config, request new ones be added to SS2, or even to create your own.
You've already briefly experienced Room Configs during the tutorial to create your first room design, when you selected one from a dropdown during the Xedit Import section. Without going into extreme technical detail, the Room Config you assign your room design is effectively telling the HQ system how to know when to show your building design as available in Command Mode for the player. Rather than having all of the room designs show up all the time, which would make the menu quite the mess, instead the Room Configs allow us to selectively show them based on which Rooms the player has chosen matching purposes for.
The Advanced Details section below outlines a lot of those technical details for those of you looking to do something more advanced or better understand how the entire system works under the hood.
¶ New Room Configs
Let's start by creating one, as while I recommend we stick all Room Configs for GNN into the Chapter 2 esm, it can still be useful for testing for you to set up your own temporarily until they can be added to the main esm. (We have an easy tool for migrating your room designs from one config to another). We'll talk about how to get your custom Room Configs added to an SS2 patch later in this guide.
First thing to do is figure out what type of Purpose you want to add to a room, you can dream up something totally new, or take an existing purpose you've seen in game and make it work with a different room shape than you know it exists in.
For example, the Medical Lab built during the main questline is setup as one of the main hall sections. Medical Lab is the purpose, and GNNMainHallQuadrant is the shape, you could create an alternate version of the Medical Lab that fits in the big central office in the middle of GNN which has the shape GNNCentralOffice.
The steps ahead will assume this example is what we're doing, but feel free to pick your own combination instead. They will also assume you finished the "Your First Room Design" tutorial and have a plugin you can work with.
- Load your plugin into XEdit, and wait for it to finish loading.
- Expand your plugin by clicking the plus sign next to the name, then right-click on File Header and choose Apply Script.
- Select SS2\HQ_CreateOrUpdateAction from Script dropdown list and click OK.
- After the form loads, choose SS2_HQ_WorkshopRef_GNN from the Target HQ dropdown, and select Room Config from the radial menu options, then click OK.
- Fill out the next form as follows:
a. Room Name: This is where your purpose goes, so enter Medical Lab here (or whatever purpose you've decided on).
b. EditorID Prefix: Enter my_ here, or whatever prefix you have decided to use for all of your forms.
c. Room Shape: Select the room shape SS2C2_Tag_RoomShape_GNNCentralOffice.
d. Action Group: Select SS2C2_HQ_ActionGroup_RoomConfig_GNN. Action Groups are a technical necessity for sorting different elements of HQ, unless you are building your own HQ you don't need to know much about them.
e. Primary Department: This determines which department's staff should spend the most time in rooms using this purpose during work hours. For our example, we'll choose the Science department. Note that this field can be left blank for places used by everyone equally, such as living quarters or off-duty type areas. - Click OK.
Your new config will now be available when you import a room design!
¶ Changing Room Configs
Let's say that you set up your whole room design and realized later it's too different from the original purpose you created, or perhaps you had created a new config and we've since added a good fit to the base mod that you want to switch to, or maybe you had just misclicked... whatever the case, we have a script to quickly switch a room design from one Room Config to another.
While creating Room Configs is quite easy, changing a room design from one to another is quite complicated to do manually, so we have an XEdit script to do all the hard stuff for you!
- Load your plugin into XEdit, and wait for it to finish loading.
- Expand your plugin by clicking the plus sign next to the name, then expand the Misc. Item section.
- Find your "Action" record (you'll learn more about these in other tutorials), which represents your room design, it will have Action_RoomConstruction or Action_RoomUpgrade, the Room Shape, and part of the design's name. Right-click it and choose Apply Script.
- Select SS2\HQ_ChangeRoomUpgradeConfig from the Script dropdown, and click OK.
- Select the room config you want to change to in the New Room Config dropdown, and then click Next.
Note: This menu will present you with all available Room Configs, it does not limit by Room Shape, so be sure you have the correct Room Shape and purpose Room Config selected, both pieces of information should be in the name. - The second screen you can just click Next on, this is an advanced screen that very few people will need to tinker with. If you are interested in what this screen is referring to, check out the Advanced Details section of this guide, which will discuss Room Slots in more detail.
That's it - your room design will now be associated with the correct room config!
It's important to note that if you have already released your mod, changing the Config will not change anything in existing save files. This will only impact new construction of your room design.
¶ Advanced Details
The information in this section is not necessary for most use-cases, but is provided for those of you who enjoy the technical details, or perhaps are designing your own HQ and need to better understand it all.
Room Configs are unique to each HQ, so all of them you find in the Chapter 2 esm, only work for GNN, but if you are making your own HQ, you can reuse the same config names when creating your own Room Configs to make it quicker for players to understand your HQ.
The Room Config ties together several elements under the hood - their most important role though is setting up Command Mode to know which projects to display. The Room Config is associated with the building designs, which is why you select one during the import process, and also gets associated with the rooms at runtime. This is done through the Room Upgrade Slots.
¶ Upgrade Slots
Room Upgrade Slots allow SS2 to track which rooms and upgrades can be built. When a room is cleaned, and the player chooses what the room is for, they are actually choosing the Room Config. This config is applied to the room, and all of the entries in the RoomUpgradeSlots script property are used - from a technical standpoint, these slots increase a corresponding number on the HQ, telling it that it has another of that slot available.
If you've ever cleaned multiple of the same shape room and assigned the same purpose, you'll see how this plays out. For example, in the GNN main floor, all of the semi-circle offices in the balcony can be made living quarters. If you clean and set two of them to living quarters and wait for them to complete- the next time you enter command mode, you'll be able to build room designs for them. When you do, you'll be prompted to choose a room.
This is because the system knew there were multiple of this slot available, and so searched for all rooms with this slot applied and presented them for you to choose from.
The purpose of the Upgrade Slots is to allow different upgrades to plug into them. By default, each Room Config starts with 5 slots: Base, Decoration, Lighting, Holiday Decorations, and Faction Decorations. So while your base design likely includes items that fill the Base, Decoration, and Lighting slots, additional upgrades could be applied to plug in the Holiday or Faction Decorations. You can see this play out in GNN via the Faction Theming projects that come up for the main hall quadrants.
Though we start out all configs with those 5 slots, they are not limited to them, additional slots can be added to a Room Config if desired - either during the creation process we covered in New Room Configs section above, or later in the Creation Kit by editing the script properties of the config. For example, let's say a room naturally has a few small alcoves, it might be worthwhile to give those their own slots. That way differen upgrades could be used to fill in those slots. You can see this play out with the Main Room in the office level, which ends up with different upgrade slots for each of the cubicles.
The Office Level Main Room is an imperfect example, as the actual additional upgrade slots are provided by the room design and not the room config - but we could have done it either way and the end result would have been the same. We'll cover adding more slots to room designs in a future tutorial.
The end result of this system is that rooms can effectively have infinite upgrade slots to allow a ton of customization for the player. Instead of just a single building plan, like a plot, each room can have a different design plugged in to each slot - and Room Configs apply the initial set of slots.
¶ Editing in the Creation Kit
Most HQ related things you create will be initially done in XEdit with one of our scripts, but editing them, especially for advanced features, is sometimes better done in the Creation Kit. Much like plot related content, we often store our data on Misc Objects.
When you open up your Room Config in the Creation Kit, you'll find that it only has 3 things set up, the Name - which as we discussed in previous sections is the "Purpose", a script, and a few keywords.
¶ Keywords
The keywords will always be as follows: SS2_Tag_HQ_Action, SS2_Tag_HQ_ActionType_RoomConfig, SS2_Tag_HQ_Form, and then the one variable keyword on each config is the Room Shape keyword. Generally you won't ever be editing these manually, unless during creation you selected the wrong Room Shape by mistake - in which case, you'd fix it by deleting the incorrect room shape keyword, and then adding the correct one here. In addition you'd need to update the shape in the script properties.
¶ Script Properties
The script properties are where the meat of the content is on most SS2 items, and these are no exception. One of the difference between HQ related scripts and many of the other systems in SS2, is that we used a lot of what's called inheritence - which means that our scripts will often include a lot of extra fields you can safely ignore unless you're trying to do something particularly advanced.
For now, I'll just go over the script properties that are unique to Room Configs, you'll eventually learn about the others as necessary, since they are part of other objects in HQ as well.
When you open the script properties, you'll see there are a bunch of sections, we're going to focus on the section titled "RoomConfig".
bAlwaysAvailable: By default, SS2 will not display Room Configs as an option for the player to choose from the "What should this room be used for?" menu, unless there are construction options available for that Room Config. Similar to how it doesn't allow plot sizes to be built if the player doesn't have any building plans unlocked/installed for that plot type and size combination.
Setting this field to true allows this Room Config to bypass that behavior and be available as a choice no matter what. It's pretty rare this is needed, and so should be left set to false most of the time.
PrimaryDepartment: This determines which department's staff should spend the most time in rooms using this purpose during work hours. This should be left unset for areas not meant to be work spaces for a particular department, such as Living Quarters or common areas like hallways.
RoomConfigKeyword: Each Room Config has a unique keyword, this ends up being used by the code to tag certain things. Generally this should never be changed.
RoomShapeKeyword: As mentioned in the Keywords section above, if you accidentally selected the wrong Room Shape when creating the config, you need to update this field as well. Otherwise, this field shouldn't be touched.
RoomUpgradeSlots: This holds all of the Upgrade Slots the config will apply when its used. If you want to add additional, or remove some of the default, after creating the RoomConfig in XEdit, this is where you'd do it. Room Slots are very simple, they involve a unique keyword, and a misc object record pointing to that keyword, you use the misc objects for this script property.
If you want to create new slots, simply create your new unique keywords, duplicate the misc object "SS2C2_HQ_RoomSlot_Template_GNN" for each, and edit the script properties of the new slot and point its keyword to the corresponding one you created.
If you are making your own HQ, instead of using SS2C2_HQ_RoomSlot_Template_GNN, you'll want to use SS2_HQ_RoomSlot_Template and then also set the HQLocation to the location record for your HQ. Or if you created your own template, you'd use that.
¶ Submitting/Requesting Configs for an SS2 Patch
I probably have said this several times, but we are all best off if every Room Config lives in the same plugin as the HQ itself. So for GNN, this would mean in the Chapter 2 plugin.
To help facilitate this, I am happy to merge in or create new configs for any purpose and shape we have defined already. Just message me on the simsettlements.com forums with a list of Room Purposes and Shapes you'd like a pairing created for. I'll be sure to make these a priority, so they get patched in quickly.
I can also add new Purposes, we'll just need to have a discussion to ensure we're avoiding redundancy. We want to avoid things that are named too similarly as it will make it difficult for players to understand what they are getting.
In fact, this understanding is the reason why Configs all being in the same plugin as the HQ is so important. Imagine if you created a new Room Config for Living Quarters in a room shape that wasn't supported as Living Quarters yet in GNN, then another designer does the same in their plugin with the exact same shape as you did.
When the player goes to select what the room is for, they will be presented with Living Quarters twice, and each one will only be associated with a particular room design since your room designs will be connected to your copy of the config. Even though the configs have the exact same name, the code treats them as completely different things.
If instead, we put that config in a patch to Chapter 2, now you and the other author can both parent your designs to that central config, and when the player chooses it, it will unlock both of your designs in Command Mode.