Reminder - in all my tutorials, green text can be skipped by modding vets, and red text can be skipped by beginners. These are side notes meant to clarify something I imagine certain readers will have questions on, and if they are not targeted at your skill level, you can skip them or ignore them if they are over your head or seem obvious.
¶ Intro
Sim Settlements 2 has a series of flag and banner objects that are controlled at the Settlement level. This means that all of these special objects can have their art changed by just one action from the player! (Check out the little Flag on the City Planner's Desk to see this in action)
We use these special flag controllers on several building plans, City Plans, a plot power pole, and they will eventually be made available for players to use in Workshop mode. So the player can quickly theme their settlement for a Faction, or fly some other colors all around to provide a matching element tying everything together.
In this guide we'll cover both the steps for generating all of the necessary Sim Settlements 2 records to create a Dynamic Flag set, and how to setup the texture and material files necessary to bring custom textures into the mix.
The second part will assume no previous knowledge in photo editing software, and will even include steps for use in a free piece of software! So if you have an image you want to turn into a flag - you can do it with this tutorial!
¶ Preparing Flags and Banners
We'll start by assuming you have some flag textures and materials ready. If not, head down to the Custom Flag Texture section, and meet me back here when you have your texture files ready!
Each dynamic flag set is actually a series of different models all with the same material/texture applied.
¶ Material Swaps
To start, we're going to set up the necessary Material Swap records, which handle pointing model files as alternate textures.
- Be certain your textures are in Fallout 4\Data\Textures\YOURSUBFOLDER, and your materials are in Fallout 4\Data\Materials\YOURSUBFOLDER. (The Fallout 4 folder should be in your Steam directory. The default path of which is C:\Program Files (x86)\Steam\steamapps\common).
You can organize multiple levels deep for these, for example, you could do YOURSUBFOLDER\Flags. The important part is that your files need to be somewhere under the Fallout 4\Data\Textures or Fallout 4\Data\Materials directory to be detected in the CK.
If you did not have a Materials or Textures directory under Fallout 4\Data, you can create them manually.
- In the Object Window, filter for ss2*gunner under Miscellaneous > Material Swap. This will bring up the 5 different material swaps needed.
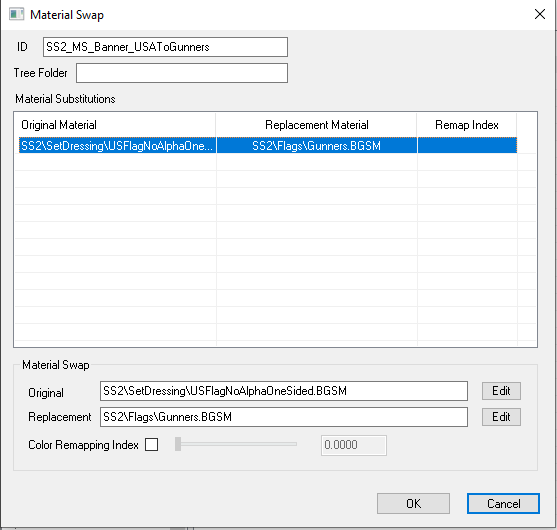
- Right-click SS2_MS_Banner_USAToGunners, choose Duplicate, then double-click your copy to open it.
- Change the ID to something Unique, for example, replace the SS2 with YOURPREFIX, and Gunners to the name of your flag.
- Click the first entry in the list so it's highlighted as shown in the screenshot below.

- Click the Edit button next to the Replacement field.
Never edit the text directly in these white boxes!
Even though the Creation Kit will allow it, my experience is that only selecting Materials via the interface that comes up from the Edit buttons actually allows the Material Swaps you create to work as they are supposed to in future steps.
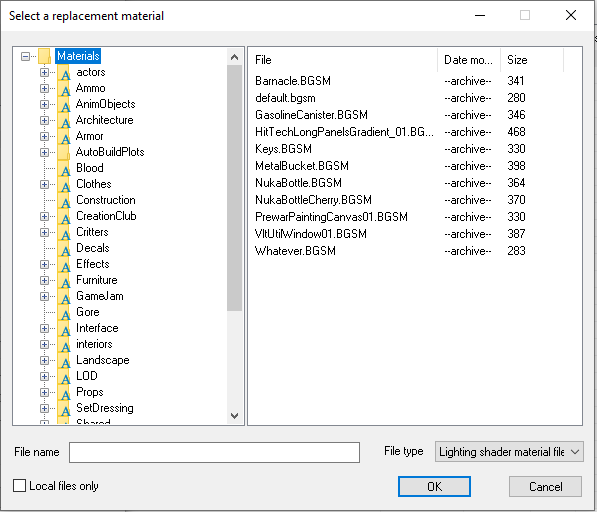
- Navigate to the material file for your flag in the "Select a replacement material" interface that appears, select it on the right, then click OK.

- Click OK on the Material Swap form, answering No to the create new record prompt, and yes to renaming.
- Repeat these steps for the remaining 4 material swaps you filterd for in step 1: SS2_MS_Flag_MMToGunners, SS2_MS_HalfCircle_USAToGunners, SS2_MS_MinutemenBacklitFlagToGunners, and SS2_MS_USAFlagToGunners.
For those of you are exceptionally artistic, you'll be happy to know you don't HAVE to use the same texture on all these models. You can absolutely use a different texture on each. We wanted to very badly in SS2 (especially those banners!), but alas, filesize reared it's ugly head so we cut down.
The textures and material files are never referenced by SS2 itself, they are explicitly set up on these Static/MoveableStatic records, so you can create copies of these statics, give them custom textures, and even tinker with the UV Map in Nifskope for things like the banners to eliminate the mirroring!
¶ Flag & Banner Records
Next we create the actual records of models with your Material Swaps applied. We'll repeat the pattern of using our Gunner versions as templates.
- In the Object window, filter for ss2*banner*gunners under WorldObjects > Static.
- Right-click on one of the entries, and duplicate it, then open the copy by double-clicking it.
- Change the ID to something unique, for example, changing SS2 to YOURPREFIX, and changing Gunners to the name of your flag.
If you opt not to follow this naming scheme, jot down what the Gunner record ID was and what you changed yours to for each, or you will have trouble knowing what record goes where in the next section.
- Click the Edit button next to the Model field.
- In the Material Swap dropdown, select the Material Swaps you created in the previous section (only one of them should show up here). Then click OK.
If it doesn't show up, this usually means you missed the warning above about not typing into the material fields, as this is the step it tends to break by doing so. You may need to recreate your Material Swap records from the previous section.
If on the other hand, it does show up in the drop-down menu, but your texture doesn't seem to swap when you select it, that could mean that you set up your Material file incorrectly, the texture is not in the correct place, or it could just be that you need to save your plugin and relaunch the Creation Kit.
- Click OK on the Static form, answering No to creating a new form, and Yes to renaming.
- Repeat the above steps for the other models that came up under your filtering.
- Filtering for ss2*flag*gunners, and repeat the above steps for these as well.
- With the same filter, click on MovableStatic under WorldObjects, and repeat the above steps for SS2_FlagWaving_Gunners.
¶ Setting Up the Flag Theme
Now that you have all of your different material swapped models configured, it's time to group them up as a Theme.
- In the Object Window, filter for SS2_ThemeDefinition_Flags_Template under Items > Armor. Right-click the form and choose Duplicate, then open the copy.
- Change the ID to something unique, such as yourPrefix_ThemeDefinition_Flags_FLAGNAME.
- Change the Name field to the name you would like players to see when selecting your flag.
- Click Edit next to the World Model field in the top middle (the one under Male that is filled out currently).
- Select your Material Swap record in the Material Swap dropdown menu, then click OK.
- Double-click the SimSettlementsV2:... entry under Scripts to bring up the script properties.
- Fill out the properties as follows:
- FlagBannerTownStatic: Form Type: Static, Pick Object: yourPrefix_StaticBanner_FLAGNAME
- FlagBannerTownTorn: Form Type: Static, Pick Object: yourPrefix_StaticBannerTorn_FLAGNAME
- FlagBannerTownTornWaving: Form Type: Static, Pick Object: yourPrefix_WavingBannerTorn_FLAGNAME_DoNotSCOL
- FlagDown: Form Type: Static, Pick Object: yourPrefix_FlagDown_FLAGNAME
- FlagHalfCircleFlag01: Form Type: Static, Pick Object: yourPrefix_HalfCircleFlag01_FLAGNAME
- FlagHalfCircleFlag02: Form Type: Static, Pick Object: yourPrefix_HalfCircleFlag02_FLAGNAME
- FlagWall: Form Type: Static, Pick Object: yourPrefix_FlagWallFLAGNAME
- FlagWaving: Form Type: MovableStatic, Pick Object: yourPrefix_FlagWaving_FLAGNAME
- Click OK to close the script properties.
- Click OK on the armor record, answering No to create a new form, and Yes to renaming.
¶ Injecting Your Flags
All that's left to do now, is tell Sim Settlements 2 about your new Dynamic Flag!
- In the Object Window, filter for SS2_Flags_AddonTemplate under Miscellaneous > FormList. Right-click and duplicate it, then double-click your copy.
- Change the ID field to something like yourPrefix_Flags.
- Leave the first entry in place, that keyword always needs to be the first entry, and then drag the title bar of the formlist window off to the side.
- In the Object Window, filter for your flag themes under Items > Armor drag them onto the formlist. Then press OK to close the formlist, answering No to creating new, and Yes to rename.
- In the Object Window, filter for your addon config under Items > MiscItem and double-click it to open it, then double-click the script on it to bring up the Script Properties screen.
If this is your first time working on an addon, or you haven't created addon configuration data yet, check out this tutorial).
- Double-click the property MyItems, then click Add on the far right and find the formlist you created in step 1.
¶ Custom Flag Texture
This section will detail the steps to take any image, and make it work as a flag. It will not cover any actual image editing, simply the mechanical steps to get your texture into the right format and set up a Material file.
To follow this section, you will need the following:
Gimp (which is free) or Photoshop
Gimp DDS Plugin or Photoshop Intel Textureworks Plugin
Material Editor by ousnius
You will also want to pull the following files from the Addon Maker's Toolkit, inside the Custom Flag Helper Files folder:
Flag_Material_Template.BGSM - which tells the game which texture files to use.
Flag_Diffuse_Template_d.dds - which is the art texture file we'll edit.
¶ Setting Up Your Files/Directories
- Go into your Fallout 4/Data folder, this is usually found under C:/Program Files(x86)/Steam/steamapps/common. This is where your game files exist.
- If you don’t have a folder called Textures, create it. Then inside of that, create a new folder for your mod.
- Copy Flag_Diffuse_Template_d.dds to the folder, now rename it something for the first flag you want to create, for consistency sake, make sure it ends in “_d” like the current name.
For example, if you decide to name it MyFlag, name it MyFlag_d instead. The d stands for diffuse, and represents what most people would consider the texture.
- Return to your Fallout 4/Data folder, if you don’t have a folder called Materials, create it. Then inside of that, create a new folder for your mod.
- Copy Flag_Material_Template.BGSM to this folder, now rename it something similar to the texture name you used above for the first flag you want to create.
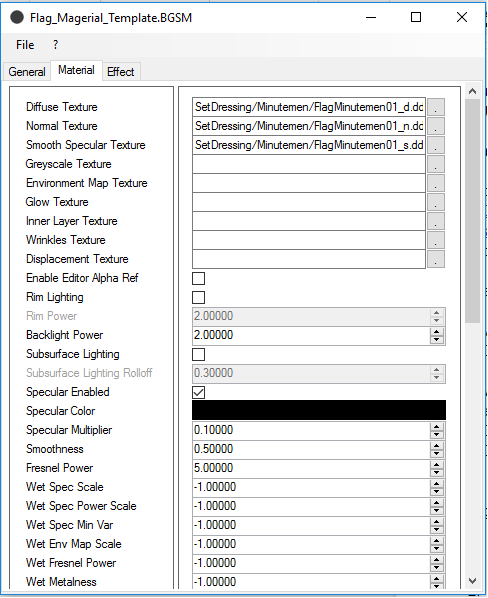
- Open the .BGSM file you just renamed in the Material Editor program.
- Go to the Material tab, then click on the grey box to the far right next to the Diffuse Texture row, and navigate to the DDS file you setup in step 3.

- Now save the material and exit this program.
¶ Using Your Image As the Texture
- Open the DDS file you setup in the previous section using either Gimp or Photoshop. This image will act as a guide for positioning, you don't actually need to keep any of the content of the texture.
- Bring in your image and position and resize it to take the same approximate space of the top copy of the texture. Then copy paste that over the bottom half as well. (If you know how to use Layers, work with your new texture on a layer and then delete out the default layer content before exporting)
While the two copies of the flag are identical in the template texture you're covering, the bottom half is actually occasionally used to represent the backside of the flag for some models. If your texture doesn't look correct on some models, you may want to mirror it for the bottom half.
Artists - notice that the image does support an Alpha channel, so you can make your flag as tattered or whole as you like!
- Once you're satisfied with your version of the texture, export it to DDS again using the following steps:
¶ Gimp
- Choose File -> Export As, in the window that pops up, select the file you are editing, then press Export. A second window will come up with DDS settings.
- Set Compression to BC3/DXT5
- Change Mipmaps to Generate mimmaps
- Press OK
¶ Photoshop
- Choose File -> Save As, in the Save As Type dropdown, select Intel Textureworks, click Save. A second window with come up with DDS settings.
- Change Texture Type to Color + Alpha
- Set Compression to BC3 8bpp (Linear)
- Set Mip Maps to Auto Generate
- Press OK
You're now ready to head back up and put your flag in the Creation Kit!
¶ You're Done!
The last step is of course to test it in-game!
This is one of the easiest addon content pieces to test, simply build a City Planner's Desk, then activate the little flag on the desk and select yours from the interface and "Buy" it.
The actual flag selector on the desk should swap to your flag texture shortly afterwards. This represents the FlagDown record. To test the others, head to workshop mode and build the various flags and banners under Sim Settlements > Decorations > Settlement Flags. As each is built, it should quickly spawn the corresponding model with your texture applied!
The last thing you might be interested in doing, is having your flag unlocked by some sort of in-game event or gamestate. To do that, undo the Injection steps you did so far, and check out the Unlock System guide which can handle that part for you in response to something happening in-game!