Reminder - in all my tutorials, green text can be skipped by modding vets, and red text can be skipped by beginners. These are side notes meant to clarify something I imagine certain readers will have questions on, and if they are not targeted at your skill level, you can skip them or ignore them if they are over your head or seem obvious.
¶ Intro
This guide will show you how to connect to a mod that adds settlements in a custom worldspace and have those settlements function correctly with SS2's caravan system, and the VR Remote Management system that is introduced in Chapter 2.
You can even do this as a patch for someone else's custom worldspace mod, as it doesn't require that mod to be present for this to work! We've rigged up this code to allow referencing everything via ID or filename, so in theory you could make a single patch to cover a ton of worldspace mods and it would detect which ones the player had installed automatically.
¶ Worldspace Configuration
Like most systems in SS2, Worldspace registration involves setting up a MiscObject record with the necessary information.
- In the Object Window, go to the Items > MiscItem category, filter for "SS2_WorldspaceConfig_Template". Right-click and duplicate it, then double-click your copy.
- Change the ID field to something like yourPrefix_WorldspaceConfig_NAME_OF_THE _WORLDSPACE.
- Replace the text in the Name field with the name of the Worldspace as it should be displayed to the player.
- Double-click the script on the form to bring up the script properties screen and fill it out as follows.
- MapForm: Leave this blank for now, unless you've already completed the VR Support section below - in which case point to the Static record you created.
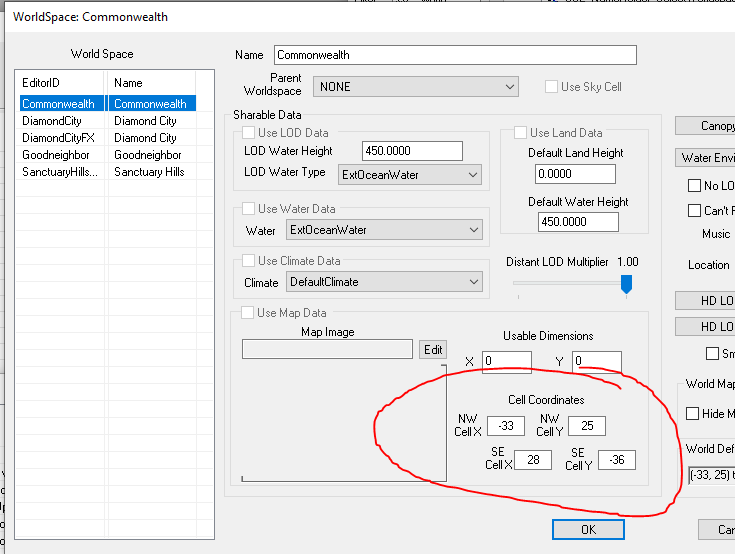
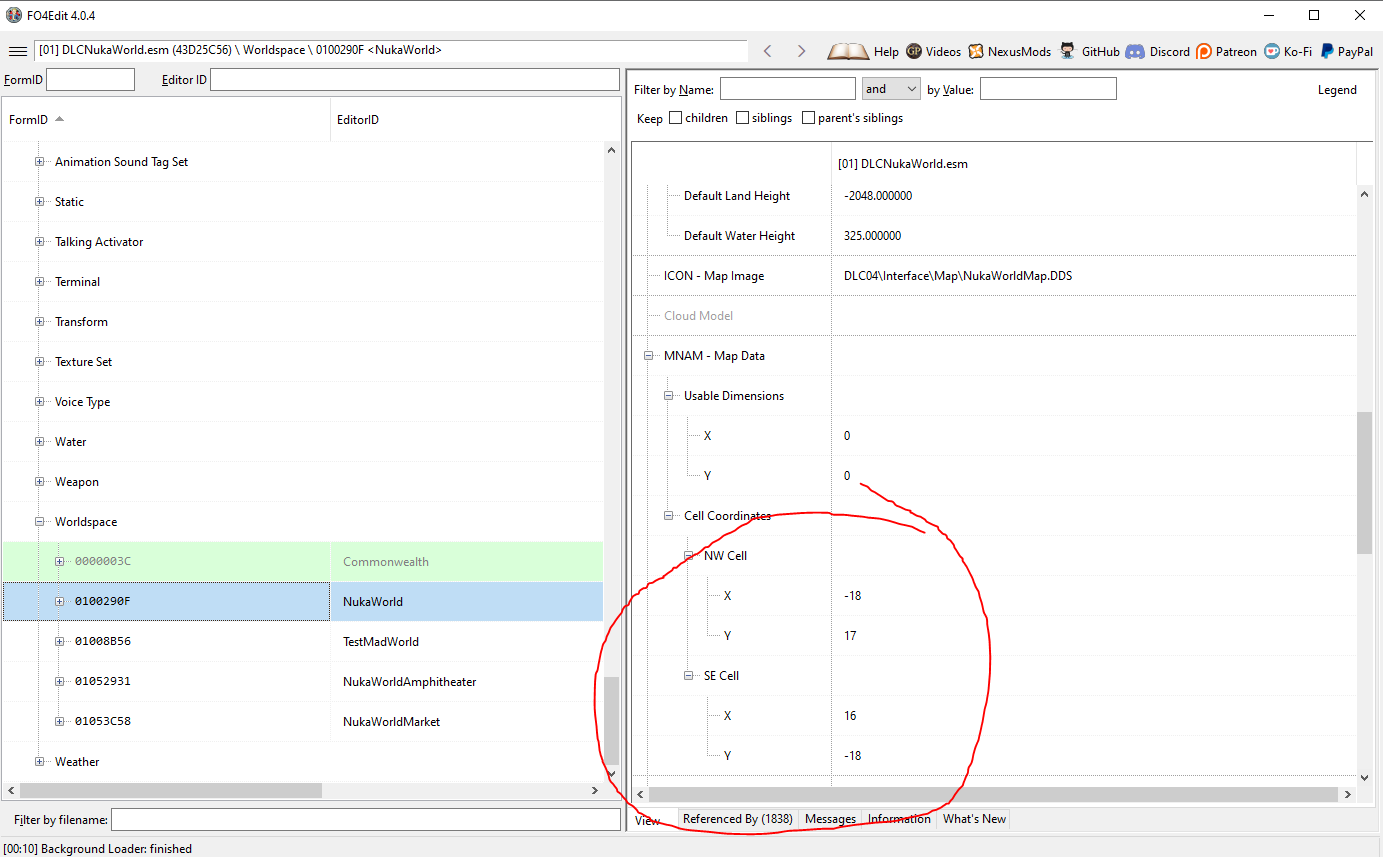
- NWCellX, NWCellY, SECellX, SECellY: These numbers can be found in one of two ways:
.... A. If you have made the custom worldspace mod a requirement for this one you are working on, you can find the details in the Creation Kit:
...... i. Click the World menu at the top of the screen and select Worldspaces.
...... ii. Select the worldspace, and the coordinates you need will be just above the OK button.

.... B. Otherwise, you can find them with XEdit by expanding the Worldspace section of the mod, clicking on the custom worldspace, and then looking under the MNAM - Map Data section.

- targetWorldspace: If you parented to the custom worldspace mod, simply set the BaseForm. Otherwise, if you want to make this work regardless of whether the player has the mod installed (only showing up if they do), you can instead set the iFormID and sPluginName parts.
.... sPluginName: The full file name of the mod, including the extension (example: CWPointLookoutFO4.esm).
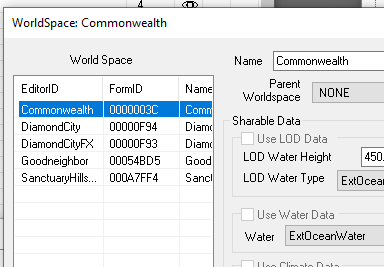
.... iFormID: This is the form ID of the worldspace converted to decimal (The Form ID is the last 6 digits of the hex number listed to the left of the worldspace name in XEdit, or in the CK, you can find this on the World > Worldspaces menu by dragging the small column between Editor ID and Name to expose the form ID column)

Once you have the form ID, you can convert it to decimal with a calculator, or a site like this.
- Finally, press OK to close the form, answering No to creating new, and Yes to rename.
¶ Advanced Settings
There are two sections of settings that are collapsed by default and aren't strictly necessary, but can be used to solve strange issues that may arise when you test.
InterWorldspaceLinks
If the custom worldspace mod has a fast travel map marker on its map, and the map of another worldspace (For example, the map markers for fast traveling from the Commonwealth to Far Harbor) you can set those up here.
For each pair of map markers, you'll set it up as follows:
- fDistanceOffset: It's very unlikely you will need this field. It is used to alter the distance when calculating an optimal map, but can be used to try and adjust odd connections between worldspaces when testing.
- iMarkerRefID1: This should be the decimal converted form ID of the first map marker's reference. This can be skipped if you are using MarkerRef1 property.
- iMarkerRefID2: This should be the decimal converted form ID of the second map marker's reference. This can be skipped if you are using MarkerRef2 property.
- MarkerRef1: This should point to the first map marker's reference. If you are not parenting to the mod, you can use iMarkerRefID1 + sPluginName1 instead.
- MarkerRef2: This should point to the second map marker's reference. If you are not parenting to the mod, you can use iMarkerRefID2 + sPluginName2 instead.
- sPluginName1: The full file name including extension of the mod that has the first map marker. This can be skipped if you are using MarkerRef1.
- sPluginName2: The full file name including extension of the mod that has the second map marker. This can be skipped if you are using MarkerRef1.
Corrections
If the settlements are not displaying correctly on the map in the VR system, these numbers can be used to adjust the positioning of the markers.
CellOffsetX & CellOffsetY: These will offset the positioning of all markers by this many cells. For example, if you entered -0.5 in CellOffsetX, it would present each marker half a cell west of its actual relative position.
DistanceScalingX & DistanceScalingY: These will change the scaling of the real world positions down to the scale of the map. For example, if the settlements seem to be pushing away from the center, you could use a less than 1 scale, such as 0.95 to bring in all markers slightly more towards the center of the map. Or a slightly larger number such as 1.025 to push the markers slightly outward from the center.
¶ VR Support
All that's required to add VR Support, is to create a simple material swap pointing to the pipboy map for that worldspace, and then adding that to the Worldspace Config record you created in the previous section. This section will walk you through that, assuming you know nothing about the tools.
You'll want to get Material Editor by ousnius to follow along if you aren't familiar with creating material files.
- Find the pipboy map texture used by the mod and extract it. It should be in its Textures.ba2 file, and likely inside of a folder with the word Interface in it.
If you've never extracted a file from a ba2 before, the Creation Kit comes with a tool called Archive2 which can be found in your Fallout 4 folder under Tools\Archive2. Use that program to open the ba2, then search up the file you need, select it, then click the Archive menu and Extract Selected To, and point it to your Fallout 4\Data\ folder.
- Extract the file "mapcommonwealth.bgsm" from the SS2 - Main.ba2 file.
- Duplicate the mapcommonwealth.bgsm file and rename it for the current worldspace you are setting up VR Support for.
- Open your file in the Material Editor.
- Go to the Material tab, then click the little grey box to the right of the Diffuse Texture line at the top, and navigate to the map texture you extracted in step 1.
- Save and exit the Material editor.
- In the Creation Kit object window, go to the Miscellaneous > Material Swap section, then in the right-half of the object window, right-click and choose New.
- Enter a unique ID, such as yourprefix_MS_VRMap_NAME_OF_WORLDSPACE.
- Right-click in the large white section in the middle and click New.
- This will bring up the Select a base material window, navigate to the SS2\overview\mapcommonwealth file you extracted in step 2, then click OK.
- Immediately the Select a replacement material window will open, navigate to your material file you created in step 3, and click OK.
- Click OK to save your Material Swap record.
- In the object window, go to WorldObjects > Static, and filter for SS2_VRMap.
- Right-click SS2_VRMap_FarHarbor and duplicate it, then double-click on your copy.
- Change the ID field to something unique, such as yourprefix_VRMap_NAME_OF_WORLDSPACE.
- Click Edit next to the Model path.
- Select the material swap you created in steps 7 through 12 from the Material Swap dropdown, then click OK.
- Press OK to close the form, answering No to creating new, and Yes to rename.
- Finally, go to the misc record you created in the Worldspace Configuration section at the top of this tutorial and point the MapForm script property at this new static record you just created.
¶ Injecting the Worldspace Configs
Once your records are created, you need to register them with Sim Settlements 2.
- In the Object Window, filter for SS2_WorldspaceConfigs_AddonTemplate under Miscellaneous > FormList. Right-click and duplicate it, then double-click your copy.
- Change the ID field to something like yourPrefix_Worldspaces.
- Leave the first entry in place, that keyword always needs to be the first entry, and then drag the title bar of the formlist window off to the side.
- In the Object Window, filter for your Discoveries under Items > MiscItem, then drag them onto the formlist. Then press OK to close the formlist, answering No to creating new, and Yes to rename.
- In the Object Window, filter for your addon config under Items > MiscItem and double-click it to open it, then double-click the script on it to bring up the Script Properties screen.
If this is your first time working on an addon, or you haven't created addon configuration data yet, check out this tutorial).
- Double-click the property MyItems, then click Add on the far right and find the formlist you created in step 1.
¶ You're Done!
If you setup the VR Support, the easiest way to confirm it worked is to load up a save with the VR system unlocked, head to that cell and activate the map to cycle through the list of registered maps and see that yours works.
If you are not familiar with the VR system, or don't have a save yet with it set up, you can skip ahead through all the quests using the City Manager holotape's cheat system. Then once all of the Chapter 2 quests (with the exception of Commonwealth Rising) are complete, you can force start the VR quest with the console command:
startquest SS2C2_Sirick_SQ02
Then go speak to Jake in the Comm Array room of the GNN HQ. The quest is quick, only involving running to Goodneighbor and then waiting a couple days. Or you can use:
sqs SS2C2_Sirick_SQ02
Which will show you a list of quest stages, and proceed to use the setstage command to complete the first handful. Don't setstage past 100. You'll want to manually complete the VR demonstration. (In a future update, we'll likely have a console command for quickly testing the VR system)
¶ Contributing to SS2 Directly
If you'd like to have the Worldspace Configs you've created added directly to SS2 for native support, so that users don't need a special patch. Feel free to contact kinggath on the simsettlements.com forums! As long as you set up the plugin without a dependency on the custom worldspace mod, we can put it right inside of SS2 to make sure every player has access to it by default!