Reminder - in all my tutorials, green text can be skipped by modding vets, and red text can be skipped by beginners. These are side notes meant to clarify something I imagine certain readers will have questions on, and if they are not targeted at your skill level, you can skip them or ignore them if they are over your head or seem obvious.
¶ Intro
This tutorial will walk you through creating a simple addon pack that offers a new building plan skin. Whether you are interested in creating skins or not, you should still go through this if you want to add ANY content to Sim Settlements 2- as it covers a lot of the basics that apply to all add-on packs, and will give you some insight into the design patterns of SS2.
Building Skins are just what you think they are, an alternate look for a Building. Just like you might have a skin for a character in many other games, Building Skins can be anything from simple retextures, to dramatic overhauls of the look of a building even changing its models entirely.
I'm a huge advocate, and will constantly recommend getting stuff into the game as fast as you can - it will keep you motivated to see lots of quick progress, and motivation is pretty key when you're trying to learn something new [especially something as daunting as modding a game!]
It's also just good dev practice as you'll find flaws in your design more quickly if you are testing them in their final home more often - so iterate frequently and put your stuff in the game whenever you find yourself losing steam.
¶ What Should I Already Know?
You will need to at least understand the basics of the Creation Kit, which includes loading and saving plugins, and searching for items in the Object Window. All of this is covered in my Creation Kit 101 video, and it should put you in a good spot to handle the rest of this tutorial!
¶ Basic Skin - Recoloring
I'm going to give you explicit steps to create a very basic skin for one of our building plans. These same steps can be applied to create a skin for any building plan, but I find it helps to reduce confusion if I always talk about very specific things when writing out tutorial steps. So I'll say things like “Double-click the static form SS2_Industrial2x2_BuildingMaterials01_L1”, even though you could be working on some other model. The point of these steps is to give you something you can repeat verbatim, to get something functional in-game.
- Open the Creation Kit and ensure SS2.esm is loaded.
- In the Object Window, filter for ss2*ind*build, then expand WorldObjects and click Static in the left-hand side of the window.
- On the right side you will see a series of forms listed starting with SS2_Industrial2x2_, find the one named SS2_Industrial2x2_BuildingMaterials01_L1 right-click this and select Duplicate.
- Your screen should refresh and if you look a bit below that item you'll find SS2_Industrial2x2_BuildingMaterials01_L1COPY0000, double-click this form to open it.
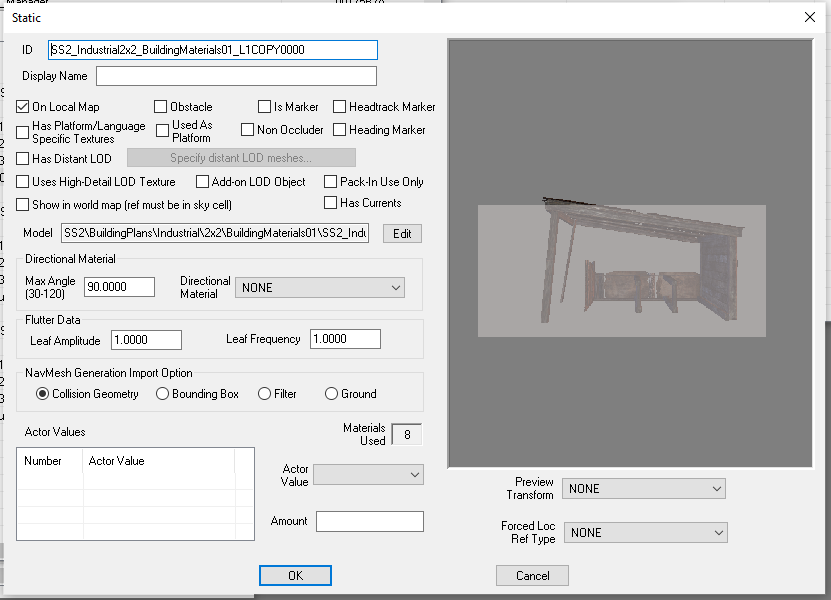
- Delete the ID field and instead enter yourPrefix_BuildingMaterials01_SkinTest_L1.
The ID field can be anything you want it to be, so long as it is completely unique. Every form in the Creation Kit has one, and it is meant to help you find your items again later.
My personal recommendation is to create a prefix you use before every single ID in your plugin, it helps you quickly identify the things you've created in a mod, versus the things that were already there from Bethesda, or our team. I generally use an acronym for the mod, or part of my handle - you'll see in many of my mods I prefix things with kg. You should come up with your own prefix and use that in your IDs.
So from now on, if you see me use “yourPrefix_” anywhere - that's what I mean - the prefix you decided to mark your stuff with.
-
Click the Edit button next to the model field towards the middle of this window.
-
In the screen that appears, change the dropdown box labeled Material Swap to point to kgSIM_WH_ShackWoodPlanks_Gold. You'll notice some of the boards on the model changed color. Now click OK to close the model screen.
What's with the translucent white box?
This is an editor marker, showing us where the navcut is. We added the marker to help us with navmeshing so we can see how big the plot actually is and can ensure our navmesh for the building will break through. You won't find it on all of our buildings, but you will find the navcut on most. We'll dive into how to do this, and benefits of it when we discuss navmeshing building plans.
No need to navmesh skins, since you duplicated a building plan model which would already have been navmeshed if necessary and the duplicated model will have the navmesh duplicated with it.
- Click OK on your static's window, a prompt titled Create New Object? will appear reminding you that you changed the ID field and ask if you want to create a new Form, answer No. You will then get a Rename Confirmation, say Yes to the rename.
If you did not get these prompts, then either you forgot to change the ID field, or you had previously answered these prompts and re-opened your form.
Or in the worst case scenario, you were working on the original form from SS2.esm instead and just edited the original - which means you also skipped step 3 - shame! This can be fixed, but that's beyond the scope of this tutorial…
- Repeat steps 3 through 8 for SS2_Industrial2x2_BuildingMaterials01_L2 and SS2_Industrial2x2_BuildingMaterials01_L3 (At step 5, use yourPrefix_BuildingMaterials01_SkinTest_L2 and yourPrefix_BuildingMaterials01_SkinTest_L3 for the ID's, it will make it much easier to do the next part if all the IDs are practically identical)
- Save your file and name it something meaningful to you so you can find it easily in the future. I highly recommend starting addon names with SS2_Addon_, this ensures that all addon content for SS2 will appear together in file managers.
Wait I thought I was going to get to color?!?
If you were hoping to make your own textures and use those - that is 100% possible, but you'll need to learn about material files for that. Check out my video tutorial on setting up custom textures and materials, and the one on Material Swaps for multiple ways of getting those custom textures set up in the Creation Kit - BYO art skills to these tutorials - I just teach the tech, not the painting!
¶ Basic Skin Form Creation
You now have your recolored building models ready to go, it's time to create the items that Sim Settlements 2 will use so that the player can select the skin in-game and apply it.
- In the Object Window, filter for SS2_Template_BuildingSkin, then expand Items and click the Weapon category on the left side.
- Right-click this and click Duplicate.
Why a weapon?
Weapons and Armor have the unique aspect of being able to display custom text in the Barter interface. We use the Barter interface for many of our dynamic menus, so we can take advantage of this to provide players a brief description of various things when they are making selections.
You'll find we use Weapons and Armor, and other related records throughout Sim Settlements 2. These are not equippable items, they are simply a means for us to give the player a better experience given UI limitations in Fallout 4.
- You'll then see your copy called "SS2_Template_BuildingSkinCOPY0000", double-click this to open it.
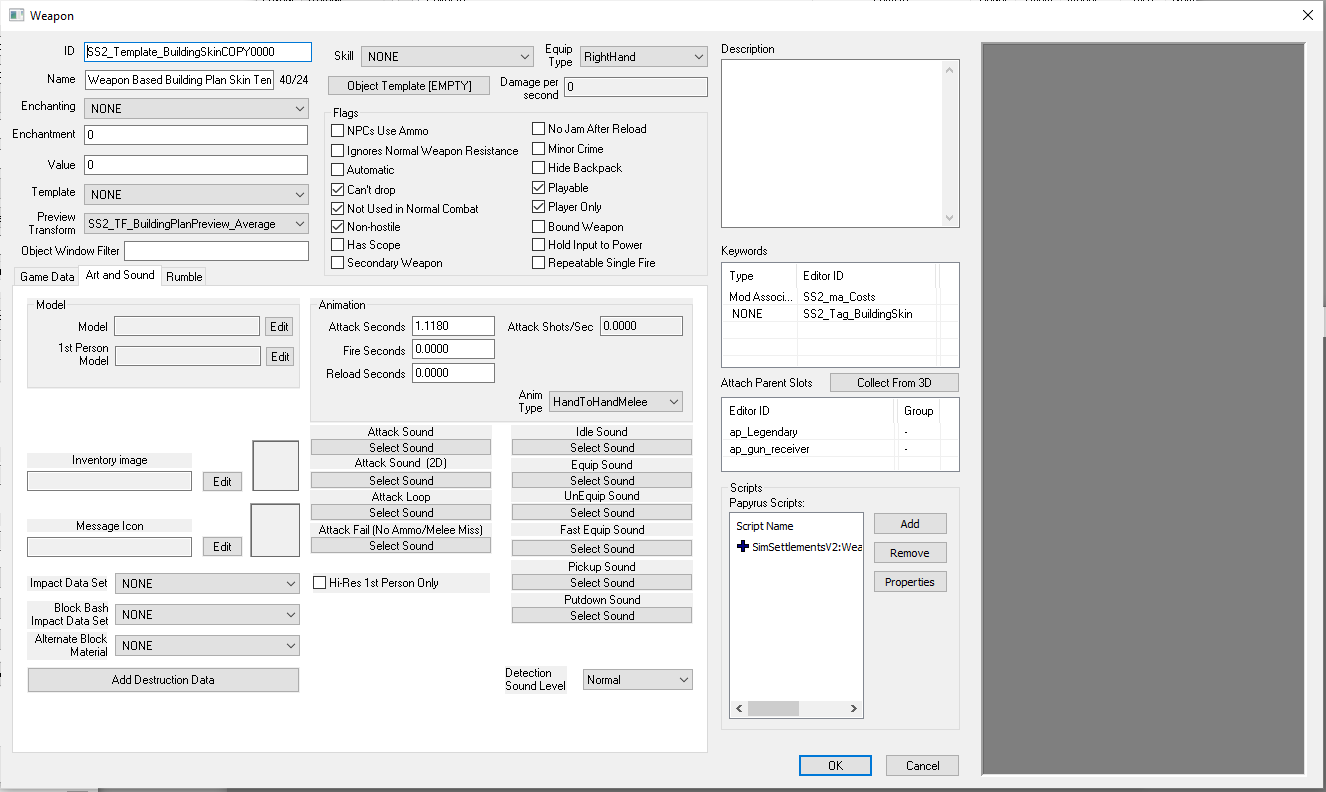
- Change the ID field to something like yourPrefix_BuildingSkin_BuildingMaterials01_Gold.
- Change the Name field to what you want the player to see when selecting the skin. Something like Gold Paintjob by Your Name (obviously replacing Your Name with your name or online handle).
- Leaving this Weapon record open (you can grab the title bar at the top and drag it over to the side for now), go to the object window and search up the static record you created in the previous section under step 5. In our example, it was called "yourPrefix_BuildingMaterials01_SkinTest_L1". Once you find it, double-click it to open it up.
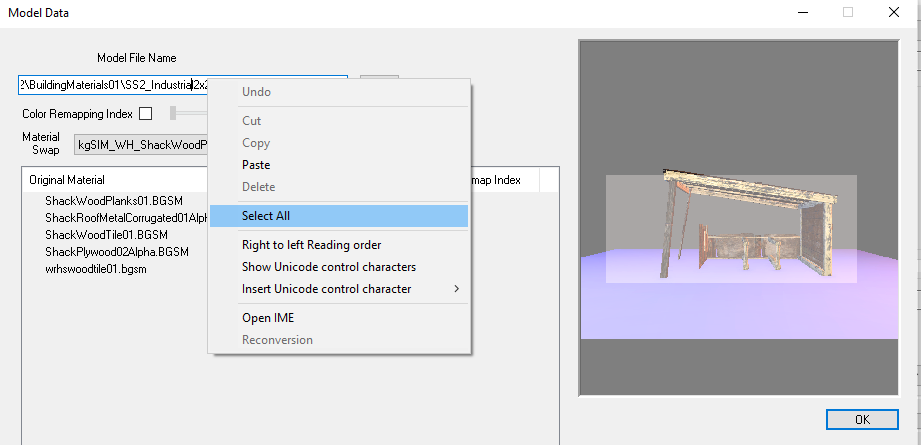
- Click the Edit button to bring up the same screen you had when changing the material in the previous section.
- Our goal this time is to copy-paste the path of this model. There are several ways to do this, but the most reliable way is to right-click the white-box with the actual file path in it, and choose Select All from the right-click menu, then right-click again and choose Copy from the right-click menu.
- Once you've copied this path, cancel out of the model screen, and the Static screen, and drag your Weapon screen back over to work on that.
- On the Art and Sound tab of the Weapon record, click the Edit button next to the Model field (this will be just below the Art and Sound tab).
- Paste in the model field you have copied by right-clicking in the white text box and choosing Paste, or by left-clicking in the white box and using the keyboard shortcut Ctrl+V.
- Once the path is pasted in, you should be able to select the same material from the Material Swap drop-down that you did in the previous section. In our example case, kgSIM_WH_ShackWoodPlanks_Gold.
- Click OK to the model screen.
- Click Ok to the Weapon screen, and as we did in the previous section, answer No when asked to create a new form, and answer Yes when asked to rename. (We'll be coming back to this record shortly to set up the script properties - just have to set up a few other things first!)
- In the Object Window, filter for SS2_Template_BuildingLevelSkin under Items > Weapon. Right-click SS2_Template_BuildingLevelSkin and choose Duplicate, then open up your copy by double-clicking it.
- Change the ID field to something like yourPrefix_BuildingSkin_BuildingMaterials01_Gold_L1. (Same ID as the Building Skin record we renamed in step 4, but adding the level to the end as L1)
- In the Scripts section, double-click the SimSettlementsV2:... script which likely has a plus sign next to it, which will bring up the script properties screen.
- Double-click the property ParentBuildingSkin, then find your building skin record we created at the start of this section in the dropdown list. (You can check in the Filter box and then type in part of the name to reduce the number of options in the dropdown box.)
- Double-click the property TargetBuildingLevelPlan, and select SS2_LevelPlan_Ind_2x2_BuildingMaterials01_lvl1 from the dropdown. (Notice that there are other items in this dropdown list for lvl2 and lvl3 which you'll use in a couple steps)
- Double-click the property ReplaceStageModel, then in the drop-down menu choose Static. There will be a long pause where the Creation Kit appears to freeze up, just wait it out, and a second drop-down box will appear below the first.
- In the second drop-down, find the static record we created in the previous section which was the material swapped version of the level 1 building. In our example, we used the name yourPrefix_BuildingMaterials01_SkinTest_L1.
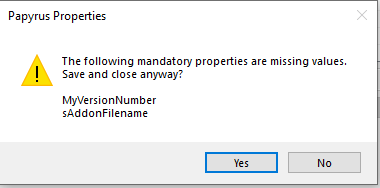
- Click OK to the script properties (you may received a warning about properties not filled out, just answer Yes to that prompt), then OK to the Weapon form, as usual answer No to create a new form, and yes to rename.
- Repeat steps 15 through 22 for levels 2 and 3.
- Now we're ready to go back to the weapon skin record we created in step 2. Find and open that record under Items > Weapon, in our example we used the name yourPrefix_BuildingSkin_BuildingMaterials01_Gold.
- Open the script properties by double-clicking the SimSettlementsV2:... entry in the Scripts section.
- Double-click the property LevelSkins, then click Add on the far right, and find the lvl1 record you created in step 15. Repeat for the level 2 and 3 records, ensuring that the 3 records are in order 1, 2, 3.
- Double-click the property TargetBuildingPlan, and select SS2_BuildingPlan_Ind_2x2_BuildingMaterials01.
- Click OK to close the script properties, then click OK to close the skin record.
Several times during these steps, you had to select a form from a list that you didn't create yourself. You might be wondering how you are supposed to figure those out in the future for other skins.
This is where going through more of these tutorials will become helpful, as you learn more about how Building Plans, and other Sim Settlements 2 objects are configured, it becomes easier and easier to know what to do. So keep going through our tutorials, and things like that will become clear very quickly.
And of course, we always have our Discord channel if you get stuck!
¶ Addon Registration
Everything is all rigged up, the last step is to tell Sim Settlements 2 about your new content! For that, you need to create what we call a controller quest, and a few records to organize all your data.
Much of this part you only have to do one time for your entire addon, and then telling SS2 about additional content tends to be mostly drag-and-drop after this.
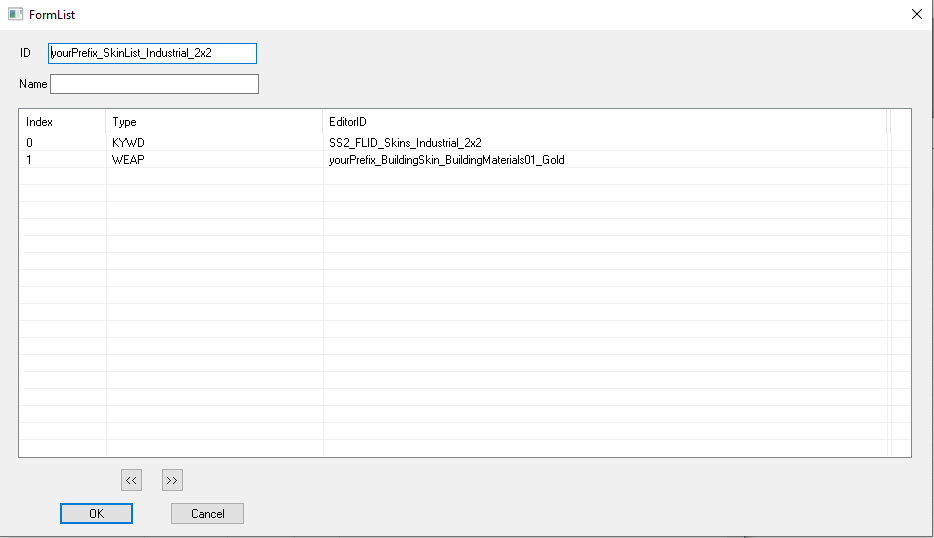
- In the Object Window, filter for SS2_SkinList_, then find SS2_SkinList_Industrial_2x2_AddonTemplate, right-click it and choose Duplicate. Then find your copy and open it.
- Change the ID field to something like yourPrefix_SkinList_Industrial_2x2, then drag this off to the side so you can add your skin record to it.
Throughout Addon creation, you will be making copies of these formlists, always leave that first default entry in those lists, as it tells SS2 how to distribute your new content correctly.
- In the Object Window, search up your skin form under Items > Weapon, we used the name yourPrefix_BuildingSkin_BuildingMaterials01_Gold. Now instead of opening that record, drag it into the large white portion of the formlist window you have open. (It should look like the screenshot below if you did it correctly)
- Click OK on the formlist, and as usual, answer No to creating a new form, and yes to renaming.
- In the Object Window, filter for SS2_Template_AddonConfig under Items > MiscItem. Right-click and choose Duplicate on that form, and then open your copy.
- Change the ID to something like yourPrefix_AddonConfig.
- Double-click the SimSettlementsV2:MiscObjects:... entry under the Scripts section.
- Double-click the property MyItems, then click the Add on the far right, and find the formlist you created in step 1.
- Click OK to close the properties window. You are going to receive a warning about fields not filled in, which you can click Yes to.
We'll cover those fields you skipped in a future tutorial about updating your add-ons after they are released. For this tutorial, we're focused on just getting your content into the game!
- Click OK to close the MiscItem record, answering No to creating a new form, and Yes to renaming.
- In the Object Window, filter for SS2_AddonTemplate under Character > Quest, right-click this form and choose Duplicate, then open your copy.
- Change the ID field to something like yourPrefix_Addon.
- Go to the Scripts tab at the top-right, then double-click the entry SimSettlementsV2:quests:AddonPack.
- Double-click the MyAddonConfig property and find the record you created in step 5 (there are a lot of MiscItem records, so probably best to use the Filter feature here to find yours).
- Click OK to close the script properties, and OK to close the quest record - hitting No to new form creation, and Yes to renaming.
In general, the pattern for registering addon content is always the same - finding the appropriate formlist from the templates like you did in step 1, and dropping all of your new items into it. Then you add your formlists to the MyItems property like you did in step 8.
Once you have created a formlist and added it to that script property for a particular type of content, all you have to do is drag and drop new items of that type to the formlist!
There is one thing to watch for though. Until you get "version control" set up, which we'll talk about in another guide, you'll always want to test your new content on a "clean save" - that is one that has never had your plugin loaded yet. There are lots of great save files available on Nexusmods.com that have your character waiting to exit the vault that are perfect for this - or you can create your own by disabling all your mods and playing through the intro sequence of the game! (I personally have created one where I have finished that part of the game, and my character is left standing next to the Sanctuary workbench ready to test.)
¶ You're Done!
Time to get in game and check out your work!
- Ensure your addon file is being loaded by the game using your mod manager. Or - you can load the game, click on the Mods option, and then click the Load Order button and find your mod in the list and enable it so that it has a checkmark next to it.
- Load up a clean save, one that hasn't played with your addon yet, and build yourself a 2x2 Industrial Plot.
Sim Settlements 2 includes a Cheat section in the holotape under Tools > Cheats. From here you can unlock all of the plots and building classes to make it faster to test things like your addons.
You can get the holotape from the MCM menu, by running to Concord and grabbing it from a table near one of the windows, or by building a City Planner's Desk in workshop mode and using its crafting to create yourself one.
- Once you have a 2x2 Industrial Plot made, activate the ASAM sensor and use the Choose Building Plan option to select the [SS2] Building Materials Shed by kinggath plan.
- After selecting the plan, select the plot with the console open and run the command: cf forceplotlevel 1 -1 this will bypass things like construction costs, or settler requirement and immediately build level 1 of that building.
Having trouble getting the console command to work? Usually this means you haven't actually clicked on the plot itself. To help with this, I highly recommend the mod Better Console F4SE - which will display the name of the object you have selected while in console mode!
- Now activate the ASAM Sensor again and scroll down to Customize Plot, and then choose Change Building Skin from the list. Once the select screen comes up, choose your skin from the list and confirm.
- A few seconds later you should see your painted model replace the original! You can then use cf forceplotlevel 2 -1 and cf forceplotlevel 3 -1 to see that level 2 and 3 of the skin worked correctly as well. (No need to re-customize the plot each level)
While this tutorial had a lot of steps, the actual work required is fairly fast, and after doing it a few times you'll be able to create these simple color change skins in minutes! There's a lot more that skins can do, plus we skipped a few steps that you would normally want to do for good user experience, which will be covered in a specific tutorial about them. The point of this guide was to show you how quickly you can get stuff into the game - as that's going to keep you motivated!
You have now seen how configuring an addon pack works and are ready to dive in to more tutorials to learn about the specifics of different types of content!