¶ Intro
For your first City Plan, we're going to create something similar to what's included with Sim Settlements 2 - a single level City Plan.
To do this, we're going to export the settlement design using the Workshop Framework settlement export, and then a special web tool we created to convert that information into a plugin you can share. Since we're only doing one level, this will go very quickly!
¶ Exporting Your Settlement
Obviously, you need a settlement to export. If you don't have one, go build one! Or if you just want to test out the process really quickly - pick a settlement, go scrap a few items, place down a few others, and toss down a plot from Sim Settlements 2 and select a building plan for it.
If you would prefer a video demonstration of the export system, check out this video!
- Launch Fallout 4 and load the save file that has your settlement design you want to use as a City Plan, then head to that settlement.
- Go to the settlement's workbench and choose the Manage option.
If Manage does not appear, it likely means you have another mod adding an activation option to the workbench. In this case, you can access the Manage menu in the Workshop Framework MCM menu or holotape under the Tools section (the holotape can be crafted at a Chemistry Workbench).
- Choose Settlement Layout, then Export Layout. Confirm you want to export and wait for it to complete.
If Export Layout does not appear, this means you are either not running the game with F4SE, or the Workshop Framework F4SE plugin failed to install (in which case you should try manually installing Workshop Framework).
- Once complete, a pop-up will inform you of the filename that was generated for your export. You'll find it in your computer's Documents folder under My Games\Fallout4\Logs\Script\User. Find the file and rename it to something you'll remember.
- Exit the game.
¶ Using the Web Tool
Now that you've exported your settlement, it's time to convert it into a City Plan plugin you can use in-game!
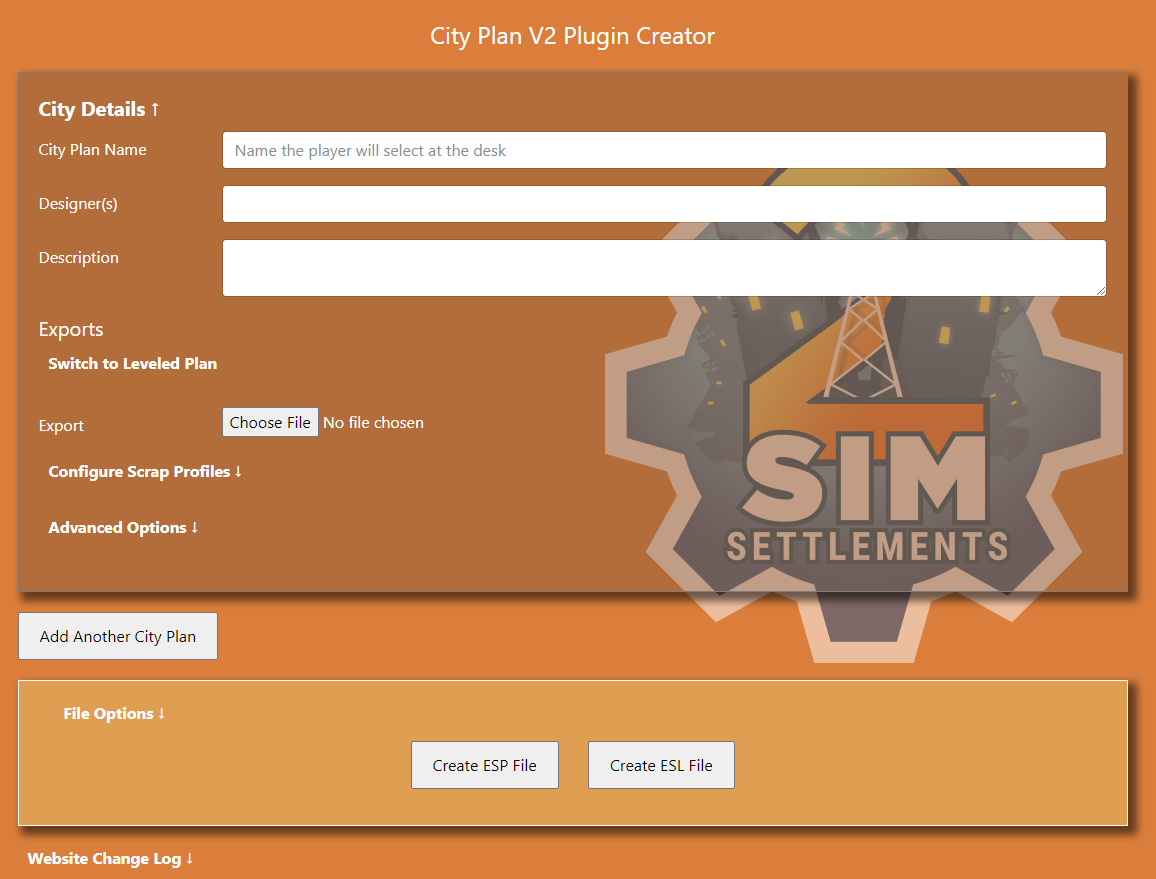
- Open a web browser and go to https://www.simsettlements.com/tools/cpV2maker.php

- Fill out the first three fields with information to present to the player.
- City Plan Name: This allows the player to distinguish which plan they are about to use.
- Designer(s): Enter your name so people know who made the plan - this will show up in game!
- Description: Enter a brief description of your City Plan, and any extra information you think the player might like to know about your plan. For example, it's common for community made city plans to list how many settlers the plan will support.
- Click the Choose File button in the center of the form (it will be labeled as Browse if you are using the Firefox browser), and upload the export file you created in the previous section.
- Click Create ESP File and a new plugin will be downloaded to your PC in a few moments!
We'll go over some of the other options of this web tool in another guide.
- Rename the file you just created to anything you like, for example, SS2_CityPlan_TestCityPlan.
¶ You're Done!
Your plugin is created you can now share it with anyone and they will be able to use your design in their game, even Xbox players if you upload to Bethesda.net!
Let's test it first though!
- Move the file you downloaded in the previous section to the Data folder in your Fallout 4 install location. The default path for this is C:\Program Files (x86)\Steam\steamapps\common\Fallout 4\Data\
- Load the game, then go to the Mods screen. Once there, press the Load Order button and find your new plugin file and make sure it is checked in. If not, highlight it and press the Enable button.
- Exit the mods screen and load a save file.
- Once in game, head to the setttlement your City Plan is for.
- Build a City Planner's Desk in the settlement.
- Generally, you wouldn't do this, but to speed up testing, we're going to turn off some of the options using the terminal. Change the following Gameplay Options:
- City Building > Leader Requirement: OFF
- Costs > Construction Costs: Plot: OFF
- Costs > Startup Costs: City Plan: OFF
- Activate the Manage City option on the desk, which should be the Blueprint object.
- Choose Select City Plan and then cycle through the City Plans until yours appears.
If yours does not appear, exit this menu and wait several minutes before trying again. If you have a large number of addon packs installed for SS2, it can take a short time before your City Plan registers with the system.
- Once you find your plan, select Use This City Plan, then when the second prompt appears, select Yes, Tear It All Down. Anything you had previously built should now be scrapped, as well as anything vanilla that you had scrapped in your design before exporting. Finally, your design should be built in front of you!
- Now that your City Plan is built, try assigning a settler to a plot. If everything went well, the original building plan used in your exported settlement should be chosen by that settler.
Unique NPCs may have preferences configured for certain building plans selected which can override the City Plan settings, so best to test with generic settlers.